
If you are on the lookout for a charming, sweet treat that brings a touch of Swedish tradition to your kitchen, the Swedish Sour Cream Twists (Layered Yeast Cookies) Recipe is exactly what you need. These lightly crispy, sugar-coated twists are layered with rich sour cream and yeast dough that transforms into the most delightfully tender and flaky cookies. Perfect alongside a warm cup of coffee or hot chocolate, these twists offer a perfect blend of buttery sweetness and a unique sour cream tang that will have everyone asking for seconds. Don’t miss out on making this cozy Scandinavian classic a new favorite in your baking repertoire!

Ingredients You’ll Need
This Swedish Sour Cream Twists (Layered Yeast Cookies) Recipe relies on simple, wholesome ingredients that come together beautifully to create both the flavor and texture that make these cookies unforgettable. Every component, from the silky butter to the tangy sour cream, plays a vital role in crafting these irresistible twists.
- Salted butter (1 cup, softened): The foundation of richness and flakiness in the dough.
- All-purpose flour (3 1/2 cups): Provides structure and a tender crumb when spooned and leveled carefully.
- Yeast (1 tablespoon): Adds gentle lift and lightness to the dough through fermentation.
- Full-fat sour cream (1 cup): Key for moistness and a subtle tang that balances sweetness.
- Large eggs (2): Bind the dough and enrich the flavor and color.
- Kosher salt (1/2 teaspoon): Enhances all the flavors without overpowering.
- Vanilla extract (1 teaspoon): Adds warmth and aroma to the dough.
- White sugar for rolling dough (1 1/4 cups, plus more): Prevents stickiness while adding caramelized sweetness.
- White sugar for coating twists (1/2 cup): Creates that signature sparkly, crunchy sugar crust.
How to Make Swedish Sour Cream Twists (Layered Yeast Cookies) Recipe
Step 1: Cream the Butter and Flour
Start by beating the softened butter until it is light and fluffy, which helps create a tender texture. Then add the flour and beat until it is well incorporated. This step is crucial for blending the fat evenly into the flour, setting the stage for a beautifully layered dough.
Step 2: Prepare the Sour Cream and Yeast Mixture
In a separate bowl, gently stir the yeast into the sour cream. This initiates the yeast activation, ensuring the dough will rise subtly, imparting a lovely airiness to these layered cookies.
Step 3: Add Eggs, Salt, and Vanilla
Beat the eggs, kosher salt, and vanilla into the sour cream and yeast mixture. This combination boosts flavor depth and richness, while the eggs help bind the dough together perfectly.
Step 4: Combine the Mixtures
Mix the sour cream and yeast mixture into the flour and butter base until combined. Expect a very sticky dough at this stage – that’s a good sign! The stickiness means the dough is tender and moisture-rich.
Step 5: Chill the Dough
Cover the bowl and refrigerate for at least 2 hours or overnight. Chilling gives the dough stability for easier rolling while allowing the yeast to work its magic, developing delicate flavors and texture.
Step 6: Prepare to Roll and Sugaring
Preheat your oven to 350 degrees F and line baking sheets with parchment or silpats. Then, generously sprinkle white sugar on your rolling surface to prevent sticking — this sugar also forms delightful layers and caramelized edges in the final cookie.
Step 7: Roll, Sugar, Fold, and Repeat
Place the cold dough onto the sugared surface, sprinkle more sugar on top, and roll it out into a rectangle. Then sprinkle sugar evenly, fold the dough in half, sugar the top, and roll again. Repeat this sugaring and folding process multiple times for those iconic layers that make these twists shine.
Step 8: Final Folding and Shaping
For the last roll, sprinkle sugar and fold the dough into thirds like a business envelope, adding sugar between layers. Roll the dough into a long strip approximately 4 to 5 inches by 22 to 24 inches.
Step 9: Cut and Twist
Use a pizza cutter to slice the strip into 1/2 inch wide strips, about 4-5 inches long. Twist each strip gently to reveal the layers, then roll generously in the remaining white sugar before placing on baking sheets spaced evenly apart.
Step 10: Bake to Perfection
Bake the twists at 350 degrees F for 17-20 minutes or until the edges are lightly browned. If you like your twists extra crispy for dunking in coffee, leave them in for a couple more minutes — just watch closely to avoid burning.
How to Serve Swedish Sour Cream Twists (Layered Yeast Cookies) Recipe
Garnishes
While these twists are lovely on their own, a light dusting of powdered sugar can add a touch of elegance and sweetness. Consider a drizzle of melted chocolate or a sprinkle of cinnamon sugar for extra flavor and visual appeal.
Side Dishes
These Swedish Sour Cream Twists pair beautifully with hot beverages like coffee, tea, or classic hot chocolate. Their crispy, layered texture is ideal for dunking, making them a perfect companion to your favorite warm drink on a cozy day.
Creative Ways to Present
For parties or a charming breakfast spread, arrange the twists standing upright in a decorative jar or basket lined with a linen napkin. You can also tie individual twists with twine for a rustic look or present them on a tiered dessert stand alongside fresh berries for a pop of color.
Make Ahead and Storage
Storing Leftovers
Leftover Swedish Sour Cream Twists can be kept in an airtight container at room temperature for up to 3 days. This helps maintain their crispness while preventing them from drying out.
Freezing
If you want to keep these treats longer, freeze the fully cooled twists in a sealed freezer bag or container for up to 3 months. Make sure to separate layers with parchment to prevent sticking.
Reheating
To refresh your twists after storage or freezing, warm them in a 300-degree F oven for 5-7 minutes. This will restore their crisp exterior while softening the layers inside just enough for that perfect bite.
FAQs
What makes these Swedish Sour Cream Twists different from regular cookies?
The use of yeast and sour cream in the dough creates a unique layered texture and a light tanginess, distinguishing them from typical sugar cookies or butter cookies. These twists are flaky and tender thanks to the folding and rolling technique with sugar.
Can I substitute the sour cream with something else?
While sour cream is key for the distinct flavor and moisture, you could try Greek yogurt as a substitute. Keep in mind it may slightly alter the texture and taste, so sour cream remains the best choice for the authentic experience.
Is it necessary to chill the dough overnight?
Chilling the dough for at least 2 hours is important to make it manageable and help develop flavor through yeast fermentation. Overnight chilling is ideal but not absolutely required if you’re short on time.
Can I use a hand mixer instead of a stand mixer?
Yes, a hand mixer with paddle attachments can work well to cream the butter and mix the dough. Just be sure to beat thoroughly to incorporate all ingredients smoothly, especially after adding the flour.
How can I make these twists more crispy?
Simply bake them a few minutes longer until the edges turn a deeper golden brown, especially if you love that delightful crunch for dipping. Watch carefully to prevent burning, and adjusting baking time based on your oven will help achieve the perfect crispness.
Final Thoughts
These Swedish Sour Cream Twists (Layered Yeast Cookies) Recipe are a true treasure to add to your baking collection. They strike the perfect balance between crispy and tender with a uniquely irresistible flavor that is bound to become a family favorite. Whether you’re sharing with friends or savoring a quiet afternoon treat, these layered delights never fail to warm the heart and impress the palate. So go ahead, give this recipe a try — your kitchen will thank you!
Print
Swedish Sour Cream Twists (Layered Yeast Cookies) Recipe
- Prep Time: 20 minutes
- Cook Time: 17 minutes
- Total Time: 2 hours 37 minutes (including chilling time)
- Yield: 36-40 twists
- Category: Dessert
- Method: Baking
- Cuisine: Swedish
Description
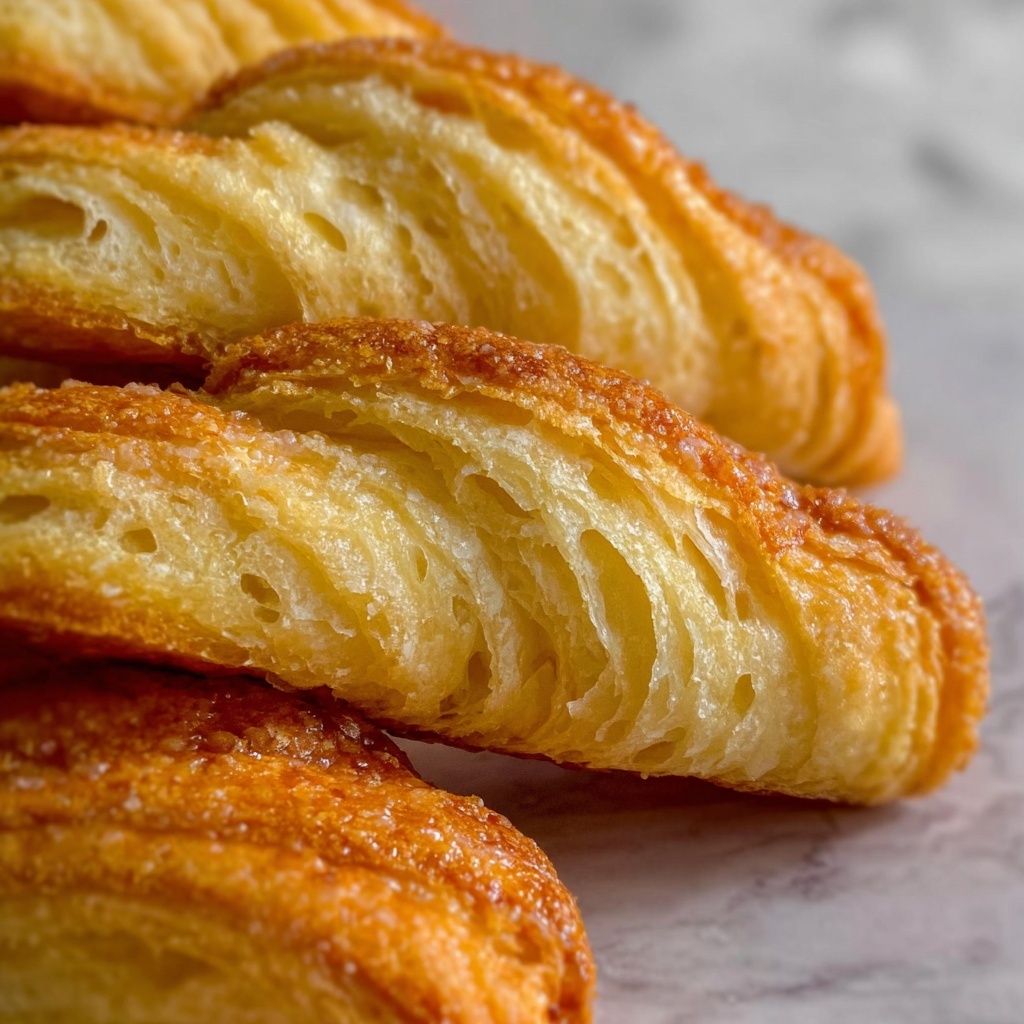
Swedish Sour Cream Twists are delightful layered yeast cookies characterized by their tender, flaky texture and a sweet, crispy sugar coating. These twists are made by folding and rolling a sticky yeast dough enriched with sour cream, butter, and eggs, then generously sugared and baked until golden. Perfect alongside a cup of hot chocolate, they combine a subtle vanilla flavor with a satisfying crunch, making them a cherished Scandinavian treat.
Ingredients
Dough
- 1 cup salted butter, softened (2 sticks)
- 3 ½ cups all-purpose flour, spooned and leveled
- 1 tablespoon active dry yeast
- 1 cup full-fat sour cream
- 2 large eggs
- ½ teaspoon kosher salt
- 1 teaspoon vanilla extract
Sugar for Rolling and Coating
- 1 ¼ cups white sugar (for rolling out dough, plus more as needed)
- ½ cup white sugar (for rolling twists in)
Instructions
- Beat the Butter and Flour: In a large bowl or stand mixer, beat the softened butter until it becomes light and fluffy. Gradually add the flour and continue beating well until combined.
- Activate Yeast in Sour Cream: In a separate medium bowl, stir the yeast into the full-fat sour cream, allowing it to start softening and activating the yeast.
- Add Eggs and Flavorings: Beat the eggs, kosher salt, and vanilla extract into the sour cream and yeast mixture thoroughly.
- Combine Dough Mixtures: Beat the sour cream mixture into the flour and butter mixture until well combined. The resulting dough will be very sticky.
- Chill the Dough: Cover the bowl with plastic wrap or a clean towel and refrigerate for at least 2 hours or overnight. Chilling helps to make the dough easier to handle and allows the yeast to develop flavor.
- Preheat Oven and Prepare Baking Sheets: Heat your oven to 350°F (175°C). Line several baking sheets with silicone mats (silpats) or parchment paper to prevent sticking.
- Prepare Sugary Rolling Surface: Sprinkle a generous amount of the 1 ¼ cups sugar on your work surface, using a pastry cloth or silpat mat for best results. Since the dough is sticky, ample sugar is essential to prevent sticking.
- Roll Out the Dough: Transfer the chilled dough onto the sugared surface, sprinkle more sugar on top, and pat it gently with your hands. Use a rolling pin to roll the dough into a rectangle shape.
- Layer with Sugar and Fold: Sprinkle more sugar over the rolled rectangle. Fold the dough in half, sprinkle again with sugar, then roll out into a rectangle once more. Repeat this sugaring, folding, and rolling process 3 to 4 times until the sugar is mostly used up, creating distinct layers.
- Final Folding: On the last roll-out, after sprinkling with sugar, fold the dough into thirds like a business envelope, adding sugar between layers.
- Roll into Strip: Roll the folded dough into a long strip approximately 4 to 5 inches wide and 22 to 24 inches long.
- Cut the Strips: Using a pizza cutter, slice the dough strip into ½-inch wide strips, each about 4 to 5 inches long.
- Twist and Sugar Coating: Twist each strip gently with your fingers, then roll it generously in the ½ cup sugar set aside for coating.
- Arrange on Baking Sheets: Place the twisted and sugared dough pieces on the prepared baking sheets, spacing them about 2 inches apart to allow for slight expansion.
- Repeat: Continue twisting and sugaring the remaining dough strips, placing them evenly on baking sheets.
- Bake the Twists: Bake in the preheated oven for 17 to 20 minutes or until the edges are lightly browned. For a crispier texture, suitable for dipping in coffee, leave them in the oven a few minutes longer.
- Cool and Serve: Remove from oven and allow the twists to cool slightly before serving. This recipe yields approximately 36 to 40 twists depending on their length.
- Enjoy: Serve these delicious Swedish Sour Cream Twists warm or at room temperature, ideally with a cup of hot chocolate for the perfect cozy treat.
Notes
- The dough is very sticky; keep your hands and rolling surface well sugared to manage it easily.
- Chilling the dough overnight enhances flavor and dramatically improves handling.
- For extra crispiness, bake a few minutes longer, watching carefully to prevent burning.
- If you don’t have a pastry cloth or silpat, generously sugar your countertop to avoid sticking.
- These twists are best enjoyed fresh but can be stored in an airtight container for up to 3 days.


