
If you are searching for a festive and irresistible treat, this Peppermint Cookie Bars Recipe is exactly what you need. Imagine a buttery, golden cookie base topped with luscious melted chocolate and a vibrant crunch of crushed peppermint candies sprinkled all over. This delightful dessert brings together the perfect balance of rich sweetness and refreshing peppermint flavor, making it an absolute showstopper at any holiday gathering or cozy night in. The layers of texture and taste will have everyone coming back for seconds and eager to grab the recipe from you.
Ingredients You’ll Need
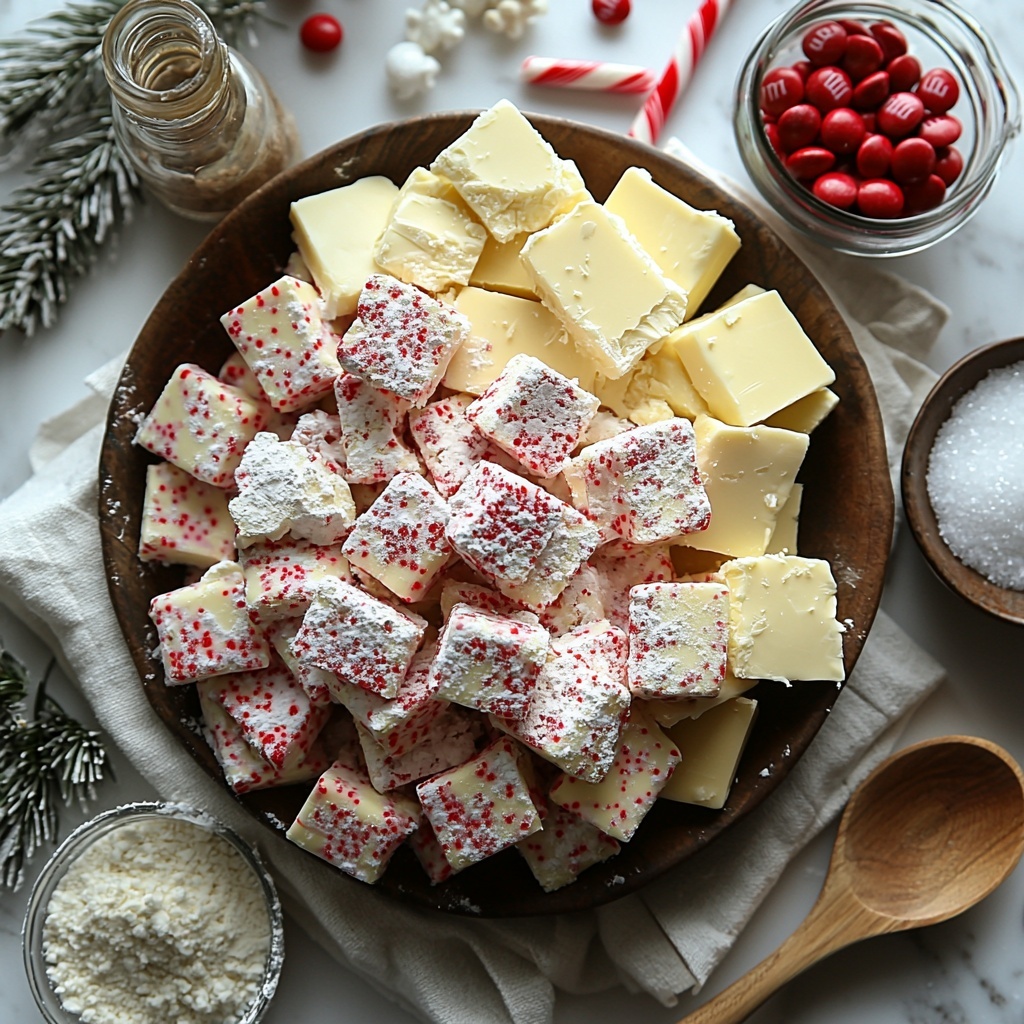
This Peppermint Cookie Bars Recipe is surprisingly simple yet uses a handful of essential ingredients that create layers of deliciousness. Each component plays a special role, from the buttery crumbly dough to the sweet chocolate chips and that unmistakable peppermint crunch on top.
- 2 cups all-purpose flour: The foundation for our cookie base, providing structure and that perfect tender crumb.
- 1 cup granulated sugar: Adds just the right amount of sweetness to balance the buttery dough.
- 1/4 teaspoon salt: Enhances all the flavors and keeps the sweetness from becoming overwhelming.
- 1 cup (2 sticks) softened butter: Gives the cookie bars their rich, melt-in-your-mouth texture.
- 1 large egg yolk at room temperature: Helps bind the dough and adds a silky richness.
- 1 teaspoon vanilla extract: Infuses a warm and inviting aroma that ties everything together.
- 1 cup semi-sweet chocolate chips: Creates a luscious melted chocolate layer that complements the cookie base beautifully.
- Handful of crushed peppermint candies, holiday M&Ms, and candy canes: Adds festive colors, refreshing crunch, and that unmistakable peppermint zing on top.
How to Make Peppermint Cookie Bars Recipe
Step 1: Prepare Your Pan and Oven
Start by preheating your oven to 350°F to ensure it reaches the perfect temperature for baking these delicious bars. Line a 13 by 9-inch metal pan with parchment paper and grease it lightly so the bars come out cleanly without sticking. Having your pan ready sets the tone for an effortless baking experience.
Step 2: Mix Dry Ingredients
Whisk together the all-purpose flour and salt in a medium bowl. This simple but crucial step guarantees your dry ingredients are evenly distributed, helping your cookie base bake evenly and develop that lovely golden crust.
Step 3: Cream Butter and Sugar
Using a hand mixer, beat the softened butter and granulated sugar in a large mixing bowl until the mixture becomes light and fluffy. This process aerates the butter, making the cookie base tender and soft once baked—a small but vital step for that perfect texture.
Step 4: Add Egg Yolk and Vanilla
Next, add the egg yolk and vanilla extract to the creamed butter and sugar. Beat these together well; the egg yolk enriches the dough, while the vanilla lends its signature warm, comforting flavor that we all know and love in holiday treats.
Step 5: Incorporate Flour Mixture
Slowly add the flour and salt mixture to the wet ingredients, a little at a time, mixing gently until the dough starts coming together. It will be crumbly but should hold when pressed. This is the perfect balance to give structure with a tender bite.
Step 6: Press Dough into the Pan
Transfer your crumbly dough into the prepared pan and spread it evenly, patting it down firmly. Then, use a fork to poke holes all over the dough’s surface; this helps it bake evenly and prevents puffing, ensuring a nice flat base ready to hold all the chocolatey goodness and peppermint crunch.
Step 7: Bake and Add Toppings
Bake the cookie base for 25 to 26 minutes or until it turns a beautiful golden brown. As soon as it comes out of the oven, sprinkle the semi-sweet chocolate chips over the warm surface. Return the pan to the oven for an extra minute to let the chocolate chips melt into a silky layer that spreads smoothly over the cookie base.
Step 8: Spread Chocolate and Add Peppermint
Once the chips have melted, use a spatula to gently spread the chocolate evenly. Immediately sprinkle the crushed peppermint candies, candy canes, and holiday M&Ms on top. The warmth from the chocolate helps these festive toppings stick beautifully, creating the ultimate holiday look and flavor.
Step 9: Cool and Slice
Allow the Peppermint Cookie Bars to cool completely, letting the chocolate set firm before slicing. This cooling step is key to getting clean cuts and enjoying that satisfying chocolate snap with every bite.
How to Serve Peppermint Cookie Bars Recipe
Garnishes
For an extra special touch, consider adding a light dusting of powdered sugar on top of the bars just before serving. Not only does this add visual appeal with a snow-dusted look, but it also enhances the sweetness without overpowering the refreshing peppermint taste.
Side Dishes
Serve these cookie bars alongside a hot cup of cocoa or a creamy latte to create a cozy, comforting dessert experience. The warm drink will beautifully complement the cool peppermint and rich chocolate flavors, turning any moment into a festive indulgence.
Creative Ways to Present
For a fun presentation, arrange your Peppermint Cookie Bars on a festive platter lined with holly leaves or sprinkle some extra crushed candy canes around the edges. Wrapping individual bars in colorful parchment or clear bags tied with ribbon makes them wonderful edible gifts that friends and family will adore.
Make Ahead and Storage
Storing Leftovers
Keep any leftover cookie bars stored in an airtight container at room temperature. They will stay fresh and delicious for up to five days, making them an ideal make-ahead dessert for holiday parties or casual snacking.
Freezing
If you want to enjoy these Peppermint Cookie Bars Recipe treats later, you can freeze them. Wrap individual bars tightly in plastic wrap and then foil to prevent freezer burn. Store in a sealed freezer container for up to three months. When you’re ready to enjoy, simply thaw at room temperature.
Reheating
These bars are perfect to eat chilled or at room temperature, but if you prefer them slightly warmed, pop them in a microwave for about 10 to 15 seconds. This quick heat will revive the chocolate’s softness without melting it completely, giving you a melt-in-your-mouth experience.
FAQs
Can I use white chocolate instead of semi-sweet chocolate chips?
Absolutely! White chocolate pairs wonderfully with peppermint and will give your bars a sweeter, creamier twist. Just be sure to watch your baking times so the chocolate doesn’t overheat.
What can I substitute for crushed peppermint candies?
If you’re in a pinch, crushed candy canes or peppermint bark work great as alternatives. Avoid using meaty or chewy candies as they might change the texture.
Are these bars gluten-free?
The classic recipe uses all-purpose flour which contains gluten. However, you can swap in a gluten-free flour blend designed for baking to make a gluten-free version without sacrificing taste or texture.
Can I make this recipe vegan?
With a few tweaks like replacing butter with vegan margarine and using egg substitutes, you can definitely create a vegan-friendly Peppermint Cookie Bars Recipe. Just keep an eye on your peppermint candies and chocolate chips as some contain dairy or other animal products.
How thick should I spread the dough in the pan?
Spread the dough evenly to about a half-inch thickness. This ensures the cookie base bakes evenly—thicker dough might remain underdone, while too thin could over-bake and become too crisp.
Final Thoughts
This Peppermint Cookie Bars Recipe is a joyous celebration of simple ingredients transformed into something magical and irresistible. Whether you are making them for a holiday party or just to satisfy a seasonal sweet craving, these bars deliver rich buttery goodness with refreshing peppermint flair that never disappoints. I encourage you to try this recipe soon and share a piece of that festive delight with everyone around you.
Print
Peppermint Cookie Bars Recipe
- Prep Time: 15 minutes
- Cook Time: 26 minutes
- Total Time: 41 minutes
- Yield: 12 servings
- Category: Dessert
- Method: Baking
- Cuisine: American
Description
These Peppermint Cookie Bars combine a buttery, soft cookie base with melted semi-sweet chocolate and festive crushed peppermint candies for a perfect holiday treat. Easy to make and irresistibly delicious, they offer a delightful mix of chocolate and mint flavors baked into a convenient bar form, ideal for sharing during the festive season.
Ingredients
Cookie Base
- 2 cups all-purpose flour
- 1 cup granulated sugar
- 1/4 teaspoon salt
- 1 cup (2 sticks) butter, softened
- 1 large egg yolk, at room temperature
- 1 teaspoon vanilla extract
Topping
- 1 cup semi-sweet chocolate chips
- Handful of crushed peppermint candies, holiday M&Ms, and a couple of crushed candy canes
Instructions
- Prepare the Pan: Preheat your oven to 350°F (177°C). Grease and line a 13 by 9 inch metal baking pan with parchment paper and set aside.
- Mix Dry Ingredients: In a medium bowl, whisk together the all-purpose flour and salt until evenly combined; set this mixture aside.
- Cream Butter and Sugar: In a separate large bowl, use a hand mixer to beat the softened butter and granulated sugar until the mixture is fluffy and light in color.
- Add Egg Yolk and Vanilla: Beat in the egg yolk and vanilla extract into the butter-sugar mixture until fully incorporated.
- Combine Dry and Wet Ingredients: Gradually add the flour and salt mixture to the wet ingredients a little at a time, mixing gently until the dough starts to come together but remains crumbly.
- Form the Cookie Base: Transfer the dough into the prepared baking pan. Use your hands or a spatula to spread and firmly pat the dough down into an even layer.
- Poke Fork Holes: Use a fork to poke holes all over the surface of the cookie dough to help it bake evenly.
- Bake the Cookie Base: Place the pan in the preheated oven and bake for 25 to 26 minutes until the crust turns golden brown around the edges.
- Add Chocolate Chips: Remove the pan from the oven and sprinkle the chocolate chips evenly over the hot cookie base. Return the pan to the oven for about 1 minute, allowing the chocolate chips to melt.
- Spread Melted Chocolate: Remove the pan again and use a spatula to spread the melted chocolate over the cookie layer into an even coating.
- Sprinkle Peppermint Candies: Immediately sprinkle the crushed peppermint candies and holiday M&Ms or crushed candy canes over the melted chocolate.
- Cool and Cut: Let the bars cool completely until the chocolate topping sets firm. Then, cut into desired size bars and serve.
Notes
- For best results, ensure the butter is softened but not melted to achieve a fluffy creamed texture with sugar.
- You can substitute holiday M&Ms with any other peppermint-flavored candies or crushed candy canes for a festive touch.
- Store leftover cookie bars in an airtight container at room temperature for up to 3 days or refrigerate for up to 1 week.
- These bars can be slightly warmed before serving to soften the chocolate topping again if desired.


