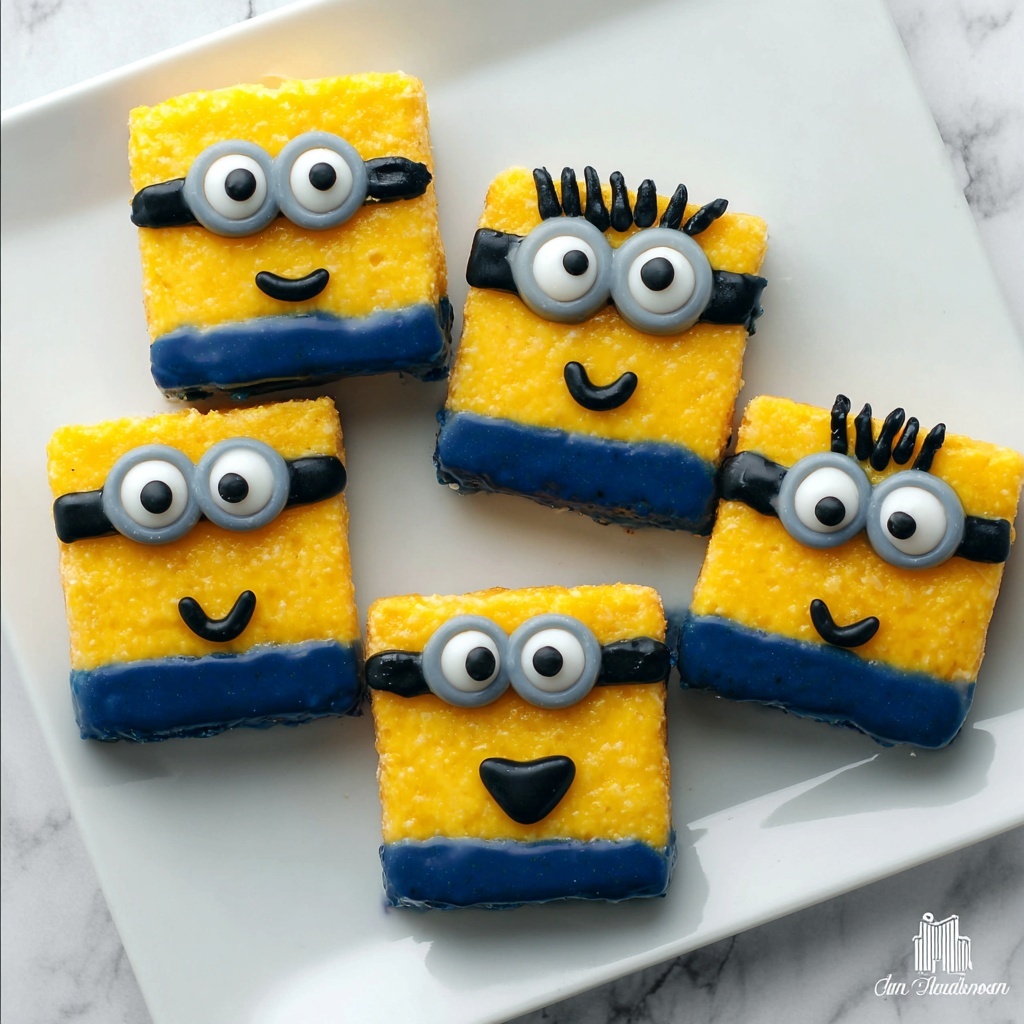
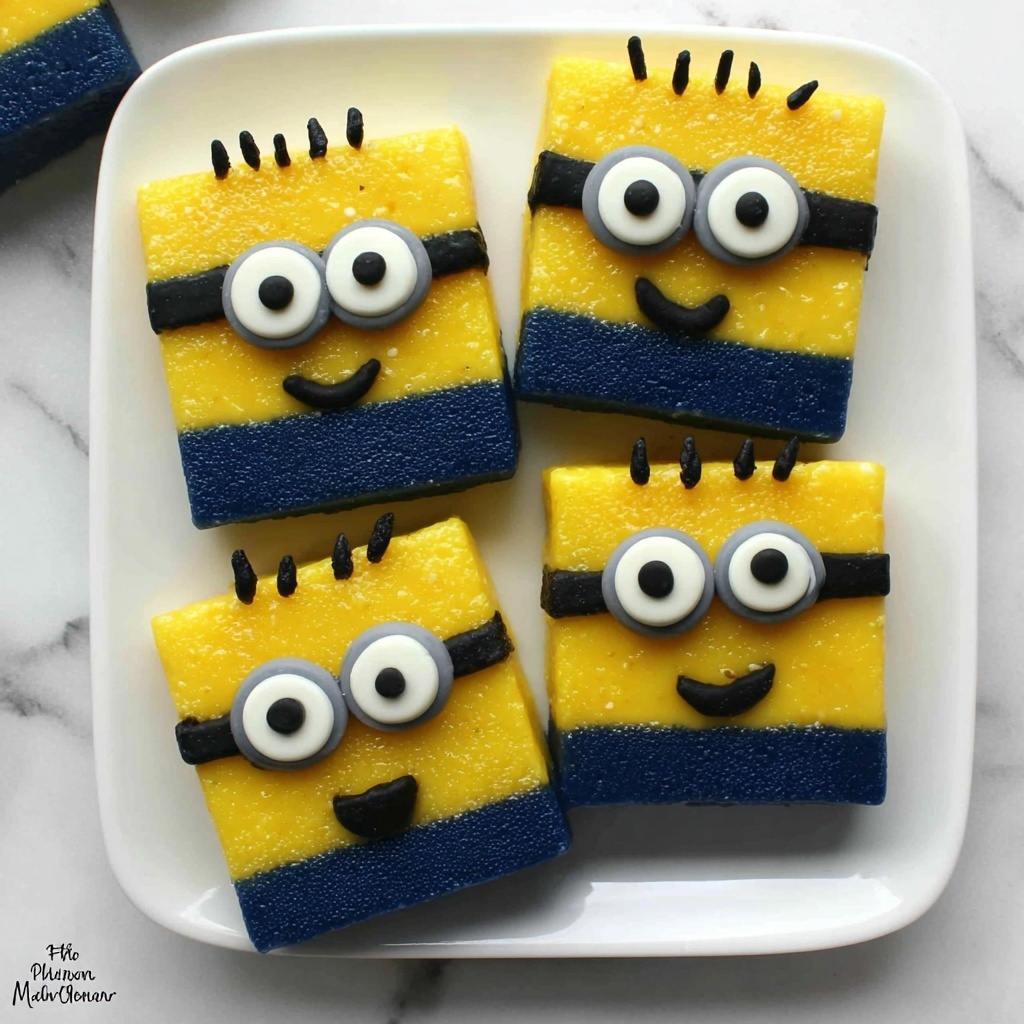
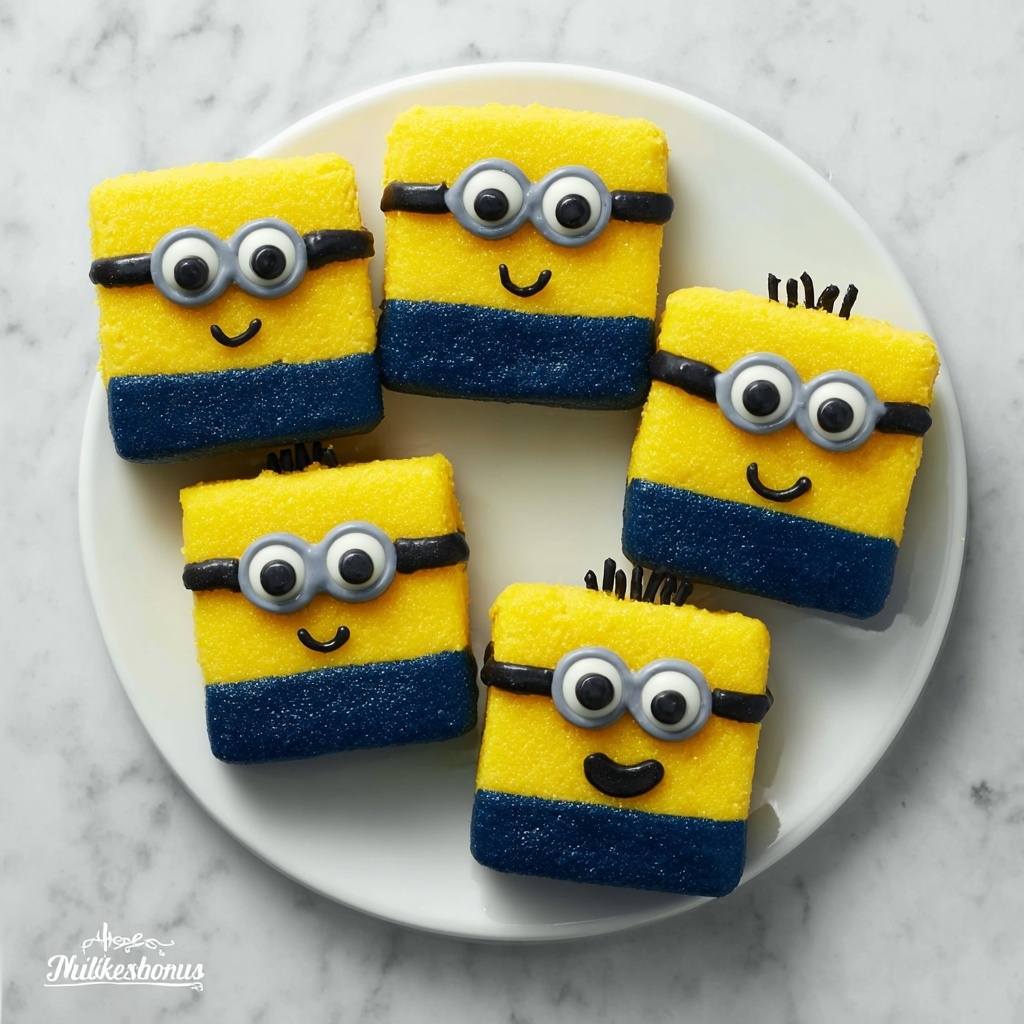
If you are looking for a fun and delightful treat that brings a smile to kids and adults alike, the Minion Rice Krispie Treats Recipe is an absolute must-try. These adorable minion-inspired snacks combine the classic crispiness and marshmallow sweetness of Rice Krispies with vibrant yellow and blue candy melts that perfectly capture the iconic look of everyone’s favorite little yellow friends. Beyond their charming appearance, these treats deliver that nostalgic, chewy texture we all adore, making them ideal for parties, school events, or simply brightening up your day with a playful snack.
Ingredients You’ll Need
Don’t be fooled by how simple these ingredients are; each one plays a crucial role in transforming ordinary Rice Krispie treats into vibrant, tasty Minion masterpieces that look as good as they taste.
- Rice Krispie Treats box: The classic base with that perfect balance of crunch and chew that’s essential to the recipe.
- Yellow candy melts: These give the signature bright yellow color of the minions, creating a smooth and shiny coating.
- Dark blue candy melts: Used to imitate the minion overalls, adding vibrant contrast and texture.
- Small edible eyes: These add personality to each minion and make them instantly recognizable.
- Black cookie icing: Ideal for drawing the minion’s frames, smiles, and details that make their faces come alive.
- Grey cookie icing: Perfect for piping the frames around the eyes with a neat, clean look.
How to Make Minion Rice Krispie Treats Recipe
Step 1: Prepare Your Workspace and Ingredients
Start by unwrapping the Rice Krispie treats and setting them aside, ready to be transformed. Prepare a double boiler setup by adding water to the bottom pot and place it over medium to high heat to start simmering.
Step 2: Melt the Blue Candy Melts
Once your water is simmering, place the top pot carefully over the bottom one and add the dark blue candy melts. Stir gently but randomly to ensure even melting without overheating. Then, dip half of each Rice Krispie treat into the melted blue candy, coating them neatly before placing on parchment paper.
Step 3: Set the Blue Coating and Prepare Yellow Candy Melts
Put the half-dipped treats into the fridge for 10 minutes to allow the blue coating to harden. While chilling, clean your double boiler pot thoroughly to prepare for melting the yellow candy melts.
Step 4: Dip the Top Half in Yellow Candy Melts and Add Edible Eyes
When the yellow candy melts are melted and smooth, take your blue-dipped treats out of the fridge and dip the top half into the yellow candy melt. Place them back on the parchment paper, but while the yellow layer is still wet, gently press on the edible eyes to bring your minions to life.
Step 5: Add the Finishing Touches with Icing
Use the grey cookie icing to pipe a clean frame around each eye, giving that signature goggle look. Then, with the black cookie icing, add the side frames, smiles, and tiny hair details to complete your minions. Set the treats aside to dry fully for 30 minutes before serving or storing.
How to Serve Minion Rice Krispie Treats Recipe
Garnishes
Consider adding a sprinkle of edible glitter or tiny yellow and blue sprinkles around the treats on the serving platter to make the colors pop even more. A few extra candy eyes scattered playfully can also add a whimsical touch and delight guests.
Side Dishes
Pair these sweet Rice Krispie treats with simple sides like fresh fruit skewers or a creamy vanilla yogurt dip to balance the sweetness. Mini sandwiches or savory popcorn make a great contrast on a party table featuring these lovable minions.
Creative Ways to Present
Serve Minion Rice Krispie Treats Recipe treats on bright-colored platters or in themed cupcake liners to match the minion colors. You can also stick a small popsicle stick into each treat before dipping to turn them into fun popsicle-style snacks, perfect for kids’ parties or easy grab-and-go enjoyment.
Make Ahead and Storage
Storing Leftovers
Keep any leftover Minion Rice Krispie Treats in an airtight container at room temperature for up to 3 days. This helps maintain their chewy texture while keeping the candy coating firm and fresh.
Freezing
If you want to save your minions for longer, wrap each treat individually in plastic wrap and place them in a freezer-safe bag or container. They can be frozen for up to one month without losing flavor or texture.
Reheating
While reheating isn’t usually necessary or recommended because it can affect the candy coating and texture, you can let frozen treats thaw at room temperature for about 30 minutes. Avoid microwaving, as it may melt the candy melts and ruin the decorative details.
FAQs
Can I make Minion Rice Krispie Treats Recipe without candy melts?
While candy melts provide the vibrant colors and smooth finish that make these treats special, you can substitute with colored white chocolate chips or colored frosting, though the texture and look may differ slightly.
Are edible eyes necessary for this recipe?
The edible eyes add a lot of character to your minions and make them instantly recognizable, but if you can’t find them, you might draw eyes with icing or use small chocolate chips as a fun alternative.
Can I use homemade Rice Krispie treats instead of store-bought?
Absolutely! Homemade Rice Krispie treats will work perfectly and give you more control over sweetness and texture, making your Minion Rice Krispie Treats Recipe even more enjoyable.
How long does it take for the candy coating to set?
The candy coating typically hardens within 10 minutes in the fridge, but giving the decorated treats an additional 30 minutes to dry completely at room temperature ensures the decorations stay intact when handled.
Is it possible to make these treats vegan or gluten-free?
Gluten-free Rice Krispies can be substituted if labeled gluten-free, and vegan candy melts are available in specialty stores; just make sure to double-check all ingredient labels to keep the recipe fitting your dietary needs.
Final Thoughts
There is something truly magical about transforming a simple classic like Rice Krispie treats into the cheerful, charming minions that everyone loves. The Minion Rice Krispie Treats Recipe is not only an enjoyable project but also a fantastic way to impress kids and guests with something colorful and delicious. Once you try this recipe, you’ll find it hard to resist making them again and again, perfect for celebrations or just a cheerful homemade snack. Dive into the fun, and watch your minions bring smiles all around!
Print
Minion Rice Krispie Treats Recipe
- Prep Time: 15 minutes
- Cook Time: 0 minutes
- Total Time: 45 minutes
- Yield: 12 treats
- Category: Dessert
- Method: Stovetop
- Cuisine: American
- Diet: Vegetarian
Description
These adorable Minion Rice Krispie Treats are a fun and easy no-bake dessert perfect for parties or themed events. Half-dipped in dark blue candy melts and topped with bright yellow candy melts, each treat is decorated with edible eyes and piped icing details to create cute minion faces that kids and adults will love.
Ingredients
Main Ingredients
- 1 box Rice Krispie Treats
- 1 bag yellow candy melts
- 1 bag dark blue candy melts
- Small edible eyes
- 1 tube black cookie icing
- 1 tube grey cookie icing
Instructions
- Prepare rice krispie treats: Unwrap the Rice Krispie treats and set aside on a clean surface.
- Melt blue candy melts: Fill the bottom pot with water and heat on the stove over medium to high heat. When simmering, place a second pot on top, add the dark blue candy melts, and stir gently until fully melted.
- Dip into blue candy melt: Dip half of each Rice Krispie treat into the melted blue candy and place it on parchment paper to set.
- Chill treats: Refrigerate the dipped treats for 10 minutes to allow the blue candy coating to harden.
- Clean pot and melt yellow candy melts: While treats chill, clean the pot used for blue candy melts and melt the yellow candy melts using the same double boiler method.
- Dip into yellow candy melt and add eyes: Remove the treats from the fridge and dip the top half into the melted yellow candy melts. While still wet, place small edible eyes onto the yellow dipped side.
- Decorate the minions: Use grey cookie icing to pipe a frame around the eyes. Use black cookie icing to pipe side frames, smiles, and hair details on each treat.
- Dry and set: Allow the decorated Minion Rice Krispie Treats to sit undisturbed for 30 minutes to fully dry and harden.
Notes
- Use parchment paper for easy removal of treats after dipping.
- Be careful not to overheat candy melts to avoid burning.
- If candy melts stiffen, gently reheat using the double boiler method.
- The edible eyes can be substituted with small candy or icing dots if desired.
- Store treats in an airtight container at room temperature for up to 3 days.


