
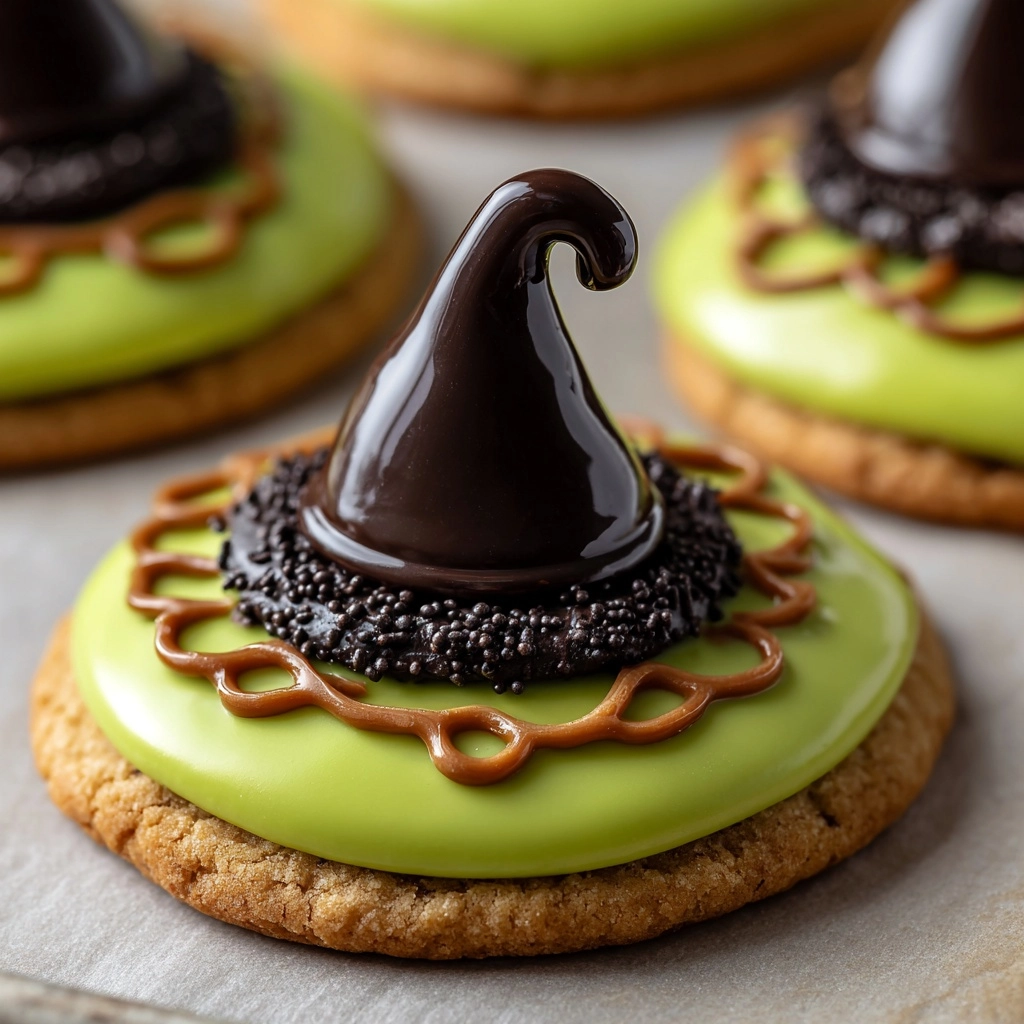
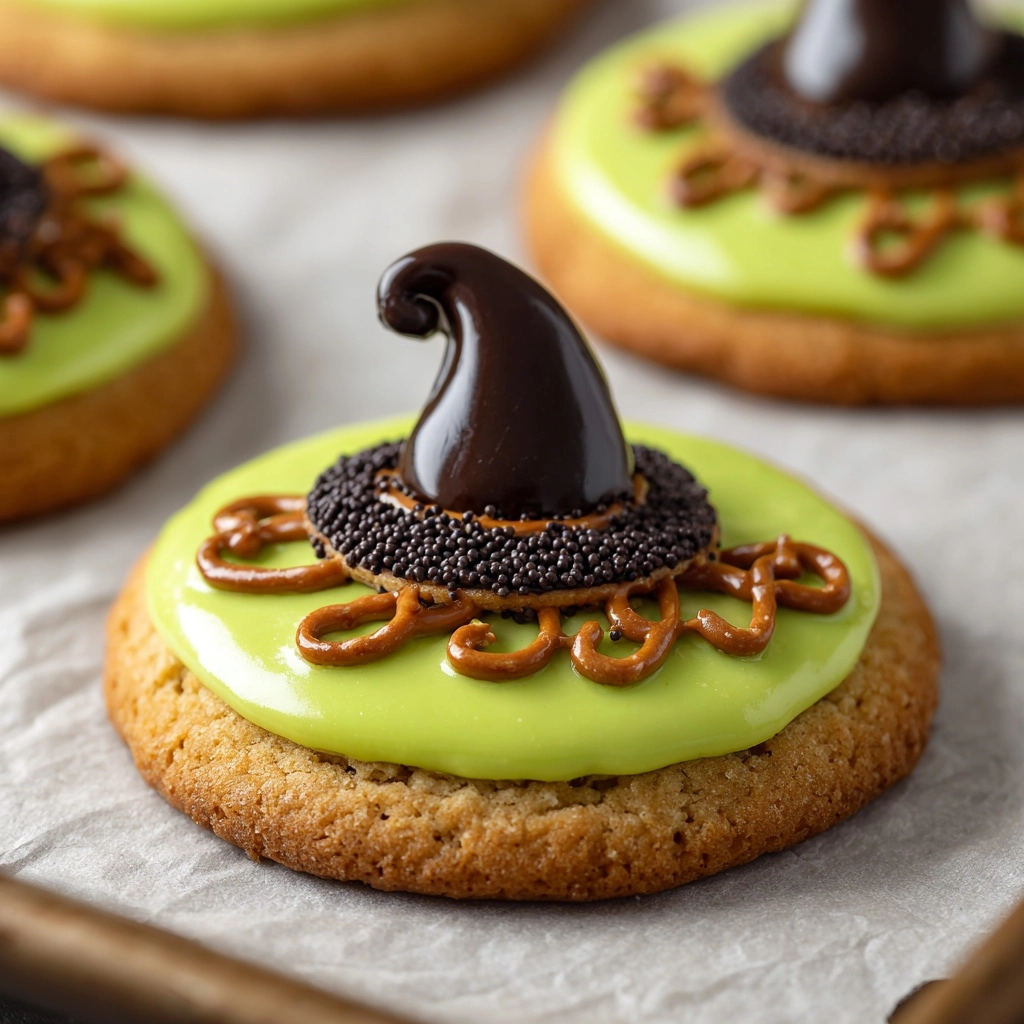
Every Halloween, nothing brings bigger smiles than surprising family and friends with a batch of these whimsical, gooey Melted Witch Cookies Recipe. With their puddles of eerie green “slime,” adorable little witch hats perched jauntily on top, and a shower of enchanting sprinkles, these cookies are both a conversation starter and a crowd-pleaser. The best part? They’re as much fun to make as they are to eat, especially if you have little witches or wizards eager to help. Whether you’re hosting a spooky gathering or just craving some playful baking, this Melted Witch Cookies Recipe will instantly bewitch anyone who takes a bite.
Ingredients You’ll Need
This recipe is delightfully simple, but each ingredient plays a vital role in delivering the classic flavors and that eye-catching look. Gather your pantry staples and a few magical extras to create unforgettable cookies you’ll want to make every Halloween!
- Unsalted butter: Makes the cookie base rich, soft, and flavorful—ensure it’s fully softened for easy creaming.
- Granulated sugar: Adds sweetness and helps the cookies spread just the right amount.
- Large egg: Binds the dough and gives a bit of tenderness.
- Vanilla extract: Infuses the cookie with warm, comforting aroma and classic taste.
- All-purpose flour: The essential base that provides structure and chew to your cookies.
- Baking powder: Helps the cookies rise slightly while keeping a soft and pillowy texture.
- Salt: Brightens and balances all the sweet flavors for a perfect bite.
- Chocolate kiss candies: These transform into the charming little points atop each witch hat.
- White chocolate chips: When melted, they become a creamy “puddle” of witchy magic (candy melts also work great).
- Vegetable oil: Ensures the melted chocolate stays smooth and glossy for perfect drizzling.
- Miniature peanut butter cups: The base of every witch hat—who can resist peanut butter and chocolate together?
- Green food coloring gel: Gives the melted chocolate that bold, spooky signature color—gel achieves the brightest hues.
- Black decorating gel: Perfect for piping on hat bands and creative details—easy to use and sets quickly.
- Orange and purple sprinkles: Fun, festive, and a must for any Halloween treat!
How to Make Melted Witch Cookies Recipe
Step 1: Prep the Cookie Base
Start by preheating your oven to 350°F (175°C) and lining a baking sheet with parchment paper for easy cleanup. In a large mixing bowl, cream together the softened butter and granulated sugar until the mixture is light and fluffy—this step creates the perfect cookie texture and infuses the dough with air. Add the egg and vanilla extract, then mix until fully combined. In a separate bowl, whisk together the flour, baking powder, and salt. Gradually add the dry ingredients to the wet mixture, stirring just until the dough comes together. Don’t over-mix!
Step 2: Shape and Bake
Scoop out tablespoon-sized portions of dough, roll them into balls with your hands, and place them evenly spaced on the prepared baking sheet. Gently flatten each dough ball—just a little—to create a base for the “puddle.” Bake for 8 to 10 minutes: you want edges set but centers still soft. Remove from the oven and let the cookies sit on the baking sheet for 5 minutes before transferring to a wire rack to cool completely. These soft cookies are the canvas for your melted “witch puddles.”
Step 3: Make the “Melted” Topping
While the cookies are cooling, melt the white chocolate chips with the vegetable oil. Microwave in 20-second intervals, stirring well between each, until smooth. Add a few drops of green food coloring gel, stirring until you achieve that perfect witchy green. The oil makes the chocolate extra glossy and easy to drizzle—resist the urge to add too much or the topping may not set.
Step 4: Assemble the Witches
Spoon a small amount of green melted chocolate on top of each cooled cookie, encouraging it to naturally drip over the edges to imitate a puddle of magical “melt.” Immediately press an upside-down miniature peanut butter cup in the center of each cookie—this creates the witch’s hat base. Top the cup with a chocolate kiss candy to form the pointed top of the hat. Grab your black decorating gel and draw a neat band around each peanut butter cup, then shower the cookies with those festive orange and purple sprinkles for maximum Halloween magic.
Step 5: Let Everything Set
Give the cookies a little time for the chocolate to set—about 20 to 30 minutes at room temperature should do the trick. If you’re in a hurry, pop them in the fridge for a few minutes. Once the chocolate puddles are firm, your Melted Witch Cookies Recipe is ready for tasting, gifting, or showing off at your next spooky gathering!
How to Serve Melted Witch Cookies Recipe
Garnishes
A swirl of extra black decorating gel around each witch’s hat, a scattering of Halloween-themed sprinkles, or even a pair of candy eyes can take these cookies to the next level. Kids especially love helping decorate every “witch”—let their imaginations run wild!
Side Dishes
Melted Witch Cookies are bold enough to stand on their own, but if you’re serving them at a party, pair with mugs of hot cocoa, apple cider, or a bowl of colorful fruit for a fun, vibrant table spread. Little snack bowls of popcorn or pretzel sticks round out a whimsical Halloween dessert bar.
Creative Ways to Present
Package these cookies in clear cellophane bags tied with purple or green ribbon for a festive party favor. Arrange them atop a cake stand with a backdrop of cobwebs and miniature pumpkins for a Halloween centerpiece, or tuck them into lunchboxes for the world’s happiest October surprise!
Make Ahead and Storage
Storing Leftovers
Once the chocolate is set, Melted Witch Cookies Recipe can be stored in an airtight container at room temperature for up to five days. To keep the decorations intact, separate layers with parchment paper and keep them out of warm or sunny spots.
Freezing
These cookies freeze surprisingly well, even with their fancy toppings. Arrange cooled, decorated cookies in a single layer on a baking sheet, freeze until solid, then transfer to a zip-top bag or airtight container. Freeze for up to a month—just allow them to come to room temperature before serving.
Reheating
No reheating is necessary for these treats, but if you’ve just taken them from the freezer, set the cookies out on a counter for about 30 minutes before enjoying. This preserves the texture of both the cookie and the decorative “melting” chocolate.
FAQs
Can I use store-bought sugar cookie dough for this Melted Witch Cookies Recipe?
Absolutely! If you want to save time, pre-made dough works beautifully—just bake as directed and decorate as described. The homemade version is extra flavorful, but shortcuts are sometimes a must.
What’s the best way to melt white chocolate chips for the topping?
Use a microwave-safe bowl and heat in short 20-second bursts, stirring frequently. Adding a little vegetable oil helps create a silky, drizzle-friendly texture and wards off any stubborn clumps.
Can I swap peanut butter cups for something nut-free?
Definitely! If you’re baking for someone with nut allergies, use mini chocolate sandwich cookies as the hat base. They look adorable and keep this recipe allergy-friendly.
How do I get the green chocolate to “drip” down the cookie?
Be generous with the melted chocolate as you spoon it on top, nudging it toward the edges so it naturally flows and drips. The oil in the mixture helps the chocolate spread easily—just don’t add so much that it runs right off!
What other decorations work for this Melted Witch Cookies Recipe?
Candy eyes, edible glitter, or a mix of spooky sprinkles work wonderfully. Let your creativity guide you—the more personality your witches have, the more memorable your cookies will be.
Final Thoughts
If you’re ready for a playful, delicious adventure in your kitchen, give this Melted Witch Cookies Recipe a whirl! Whether you’re baking with kids, friends, or solo on a cozy October afternoon, these treats are sure to enchant everyone who sees (and tastes) them. Happy Halloween, and happy baking!
Print
Melted Witch Cookies Recipe
- Prep Time: 20 minutes
- Cook Time: 10 minutes
- Total Time: 30 minutes
- Yield: 12 cookies
- Category: Dessert
- Method: Baking
- Cuisine: American
- Diet: Vegetarian
Description
These Melted Witch Cookies are a fun and festive treat perfect for Halloween. Soft and buttery cookies topped with a witch’s hat made of white chocolate, peanut butter cups, and a chocolate kiss candy, these cookies are sure to delight both kids and adults alike.
Ingredients
Cookies:
- 1 cup unsalted butter, softened
- 1 cup granulated sugar
- 1 large egg
- 1 teaspoon vanilla extract
- 2 ½ cups all-purpose flour
- 1 teaspoon baking powder
- ½ teaspoon salt
Decorations:
- 24 chocolate kiss candies
- 1 cup white chocolate chips
- 1 tablespoon vegetable oil
- 12 miniature peanut butter cups
- Green food coloring gel
- Black decorating gel
- Orange and purple sprinkles
Instructions
- Preheat the oven: Preheat the oven to 350°F (175°C) and line a baking sheet with parchment paper.
- Make the cookie dough: In a large bowl, cream together the butter and sugar. Add the egg and vanilla, then mix in the flour, baking powder, and salt until a dough forms.
- Bake the cookies: Scoop dough into balls, flatten slightly, and bake for 8–10 minutes. Cool on a wire rack.
- Decorate the cookies: Melt white chocolate with oil and green food coloring. Spoon onto cookies, add a peanut butter cup for the hat, a chocolate kiss for the head, and decorate with black gel and sprinkles.
- Serve: Allow the chocolate to set before serving.
Notes
- You can use candy melts instead of white chocolate for easier melting.
- Try adding candy eyes for extra decoration.
- Store cookies in an airtight container for up to 5 days.
Nutrition
- Serving Size: 1 cookie
- Calories: 285
- Sugar: 25 g
- Sodium: 120 mg
- Fat: 16 g
- Saturated Fat: 8 g
- Unsaturated Fat: 6 g
- Trans Fat: 0 g
- Carbohydrates: 32 g
- Fiber: 2 g
- Protein: 4 g
- Cholesterol: 25 mg
