
Sushi at home can feel like an art form, but with this simple guide on How to Roll Sushi Recipe, you’ll discover it’s a joyful and rewarding experience anyone can master. Whether you prefer the classic maki roll or the more modern inside-out style, this recipe breaks down every step with warmth and encouragement. From selecting the freshest ingredients to mastering your rolling technique, you’ll soon be creating sushi rolls that impress your friends and satisfy your cravings without ever leaving your kitchen.
Ingredients You’ll Need
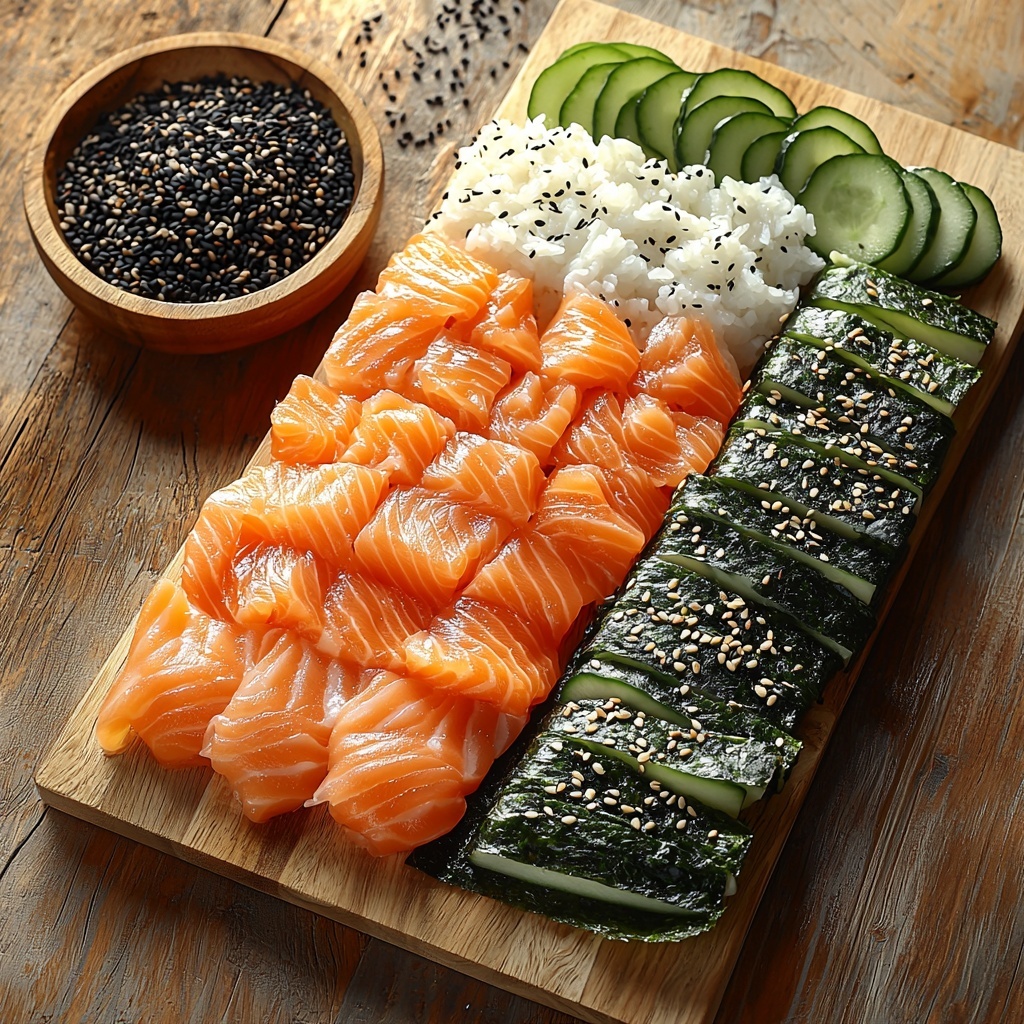
Gathering the right ingredients is the first step toward sushi perfection. Each component plays a key role—fragrant sushi rice provides the perfect sticky base, nori adds that satisfying crunch and umami flavor, and toasted sesame seeds bring a subtle nutty aroma all tied together with your favorite fresh fillings.
- Sushi rice: Use 1 cup of high-quality sushi rice for that sticky texture essential to hold your roll together.
- Nori (roasted seaweed): One sheet is perfect for wrapping and adding a balanced salty flavor.
- Toasted black sesame seeds: A sprinkle adds an irresistible crunch and visual appeal.
- Filling ingredients: These can be anything you love—from fresh cucumber and avocado to crab, tuna, or salmon for a personalized touch.
How to Make How to Roll Sushi Recipe
Step 1: Preparing Your Bamboo Mat and Nori
Start by placing your bamboo sushi mat on a flat surface. Lay one piece of nori on top with the rough, shiny side facing up and the lines aligned with the bamboo, ensuring an even rollout later. This set-up might feel delicate at first but trust that this is the foundation for your perfect sushi roll.
Step 2: Spreading the Rice
Take 1 cup of cooked sushi rice and spread it evenly across the nori with a rice paddle or your fingertips. Wetting your fingertips first helps prevent the rice from sticking. Leave about half an inch at the far edge without rice to make sealing easier when you roll.
Step 3: Adding Your Filling
Choose your filling and place it in a neat row about one-third of the way up from your side. Whether you prefer classic cucumber and crab or experiment with cream cheese and smoked salmon, this is your chance to personalize your creation. A light sprinkle of salt over the fillings helps enhance the flavor.
Step 4: Rolling the Sushi
Start rolling by lifting the edge of the mat closest to you and gently drape it over the filling. Press firmly but gently, guiding the roll as you move forward. Tightening the roll as you go is key, but don’t worry if your first few tries aren’t perfect; practice brings confidence.
Step 5: Sealing the Roll
Once the roll is formed, wet your fingers and run them along the thin strip of exposed nori. This moisture acts as glue, sealing the sushi roll firmly and keeping everything intact when you slice it.
Step 6: The Inside-Out (Uramaki) Method
If you want to get fancy, try the inside-out sushi technique. After spreading the rice on nori, sprinkle toasted sesame seeds, cover with plastic wrap, and flip the nori over before adding your fillings. This unique approach has the rice on the outside, often covered with sesame seeds, giving a different texture and presentation.
Step 7: Cutting Your Sushi
For neat slices, use a very sharp knife dipped in cold water. Cutting through 2-3 pieces at once creates even cuts without squashing the roll. If you rolled with plastic wrap during the uramaki method, gently peel it off before serving.
How to Serve How to Roll Sushi Recipe
Garnishes
Enhance your presentation with a sprinkle of toasted sesame seeds or a dash of bright orange tobiko (flying fish roe). A side of pickled ginger and a small mound of wasabi not only adds vibrant color but also complements your roll with bursts of spicy, sweet, and tangy flavors.
Side Dishes
Sushi pairs beautifully with light sides such as miso soup or a fresh seaweed salad. These dishes help cleanse your palate between bites and elevate your sushi experience to restaurant quality at home.
Creative Ways to Present
Try serving your sushi rolls sliced and arranged in a fan or spiral pattern on a wooden board or ceramic platter for an elegant look. Add small dipping cups for soy sauce and provide chopsticks or even your favorite dipping sauces like spicy mayo or ponzu for fun, customizable eating.
Make Ahead and Storage
Storing Leftovers
Sushi is best enjoyed fresh, but if you have leftovers, store them in an airtight container in the refrigerator for up to 24 hours. Keep in mind that nori tends to soften and lose its crispness over time.
Freezing
Freezing sushi is generally not recommended as it affects the texture of the rice and fillings. However, if you must freeze, wrap individual pieces tightly in plastic wrap and consume within one week after thawing in the fridge.
Reheating
Reheating sushi is tricky since the rice can become dry and the nori chewy. If you want to warm it slightly, try a quick few seconds in the microwave with a damp paper towel to maintain moisture—but fresh sushi is always the best!
FAQs
What type of rice should I use for sushi?
Short-grain sushi rice is essential for the right sticky texture. Its natural stickiness keeps the roll together perfectly without falling apart.
Can I use other fillings besides fish?
Absolutely! Vegetables like cucumber, avocado, and carrot, as well as cooked proteins like crab sticks or tempura shrimp, make delicious fillings for sushi rolls.
Do I need a bamboo mat to roll sushi?
While a bamboo mat makes rolling easier and more uniform, you can use parchment paper or plastic wrap in a pinch. Practice will help you gain confidence with or without one.
How do I prevent rice from sticking to my hands?
Keep a small bowl of water nearby and wet your fingers frequently. This simple trick prevents the rice from sticking to your skin and helps spread it smoothly.
Is it okay to eat sushi rolls with soy sauce?
Yes! Soy sauce is a classic and flavorful dip for sushi. Just be careful not to overwhelm the delicate flavors; a light dip is perfect.
Final Thoughts
Learning How to Roll Sushi Recipe opens up a world of delicious possibilities and fun kitchen adventures. With a little practice and the right ingredients, you’ll gain the confidence to create sushi that’s not only tasty but also a joy to share with loved ones. Dive in and enjoy every step of making sushi at home—it’s as rewarding as it is delicious!
Print
How to Roll Sushi Recipe
- Prep Time: 10 minutes
- Cook Time: 0 minutes
- Total Time: 10 minutes
- Yield: 1 serving (1 sushi roll cut into 8-10 pieces)
- Category: Appetizer
- Method: No-Cook
- Cuisine: Japanese
- Diet: Gluten Free
Description
Learn how to roll sushi with both traditional maki and inside-out uramaki methods using sushi rice, nori sheets, and your choice of fillings. This simple 10-minute guide covers spreading rice, adding fillings, rolling techniques, sealing, and slicing for perfect sushi rolls every time.
Ingredients
Main Ingredients
- 1 cup sushi rice
- 1 piece nori (roasted)
- Toasted black sesame seeds (optional)
Filling Ingredients
- Choose your preferred sushi fillings such as cucumber, avocado, crab meat, tuna, salmon, or other vegetables and seafood
- Salt (optional, to taste)
Instructions
- Prepare the bamboo mat and nori: Place a sheet of roasted nori onto a bamboo sushi rolling mat with the rough side up and lines aligned with the mat.
- Spread the sushi rice: Add 1 cup of sushi rice onto the nori and spread evenly with a rice paddle. Wet your fingertips and gently spread the rice to all edges except the furthest edge, leaving a ½-inch gap for sealing (traditional maki). For inside-out rolls, spread rice to all edges and sprinkle with toasted black sesame seeds, then cover with plastic wrap and flip the nori over.
- Add fillings: Place your filling ingredients in a line slightly off-center and close to you on the nori. Optionally sprinkle with a pinch of salt.
- Roll the sushi: Starting from your edge, lift the bamboo mat over the fillings, rolling tightly and pushing the fillings back as you go to form a compact roll. For uramaki, ensure plastic wrap does not get caught in the roll.
- Seal the roll: Lightly wet your fingers and moisten the ½-inch nori edge left uncovered to help the roll seal securely.
- Cut the sushi roll: Use a sharp chef’s knife and run it under cold water between cuts. Cut 2-3 slices at a time to divide the roll into 8-10 pieces. You may cut with plastic wrap on or remove it first.
- Serve: Remove any plastic wrap before serving and arrange sushi pieces on a plate.
Notes
- Wet your fingers when handling sushi rice to prevent sticking.
- Use fresh, high-quality ingredients for best flavor and texture.
- Keep a bowl of water nearby to clean your knife between cuts for clean slices.
- Customize fillings based on taste and dietary preferences.
- Practice rolling tightly to avoid loose sushi rolls that fall apart.


