
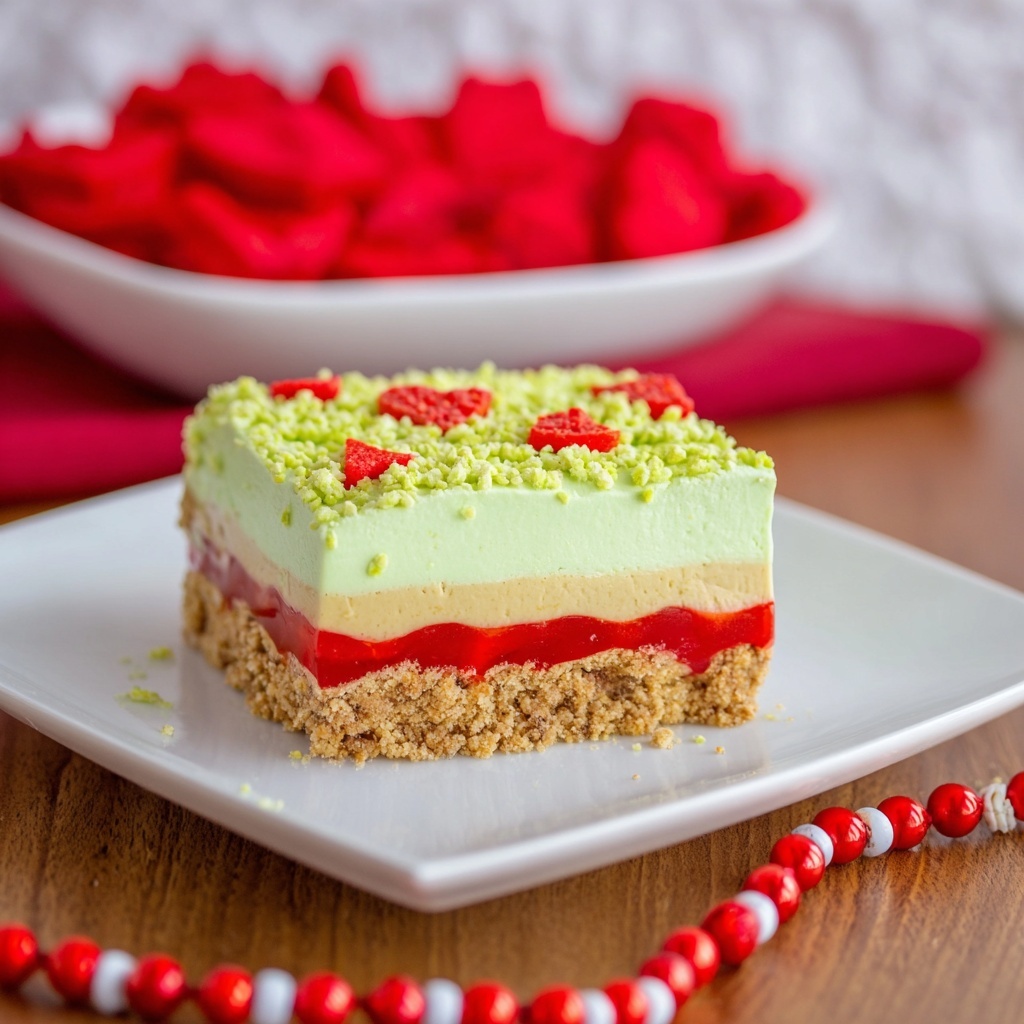
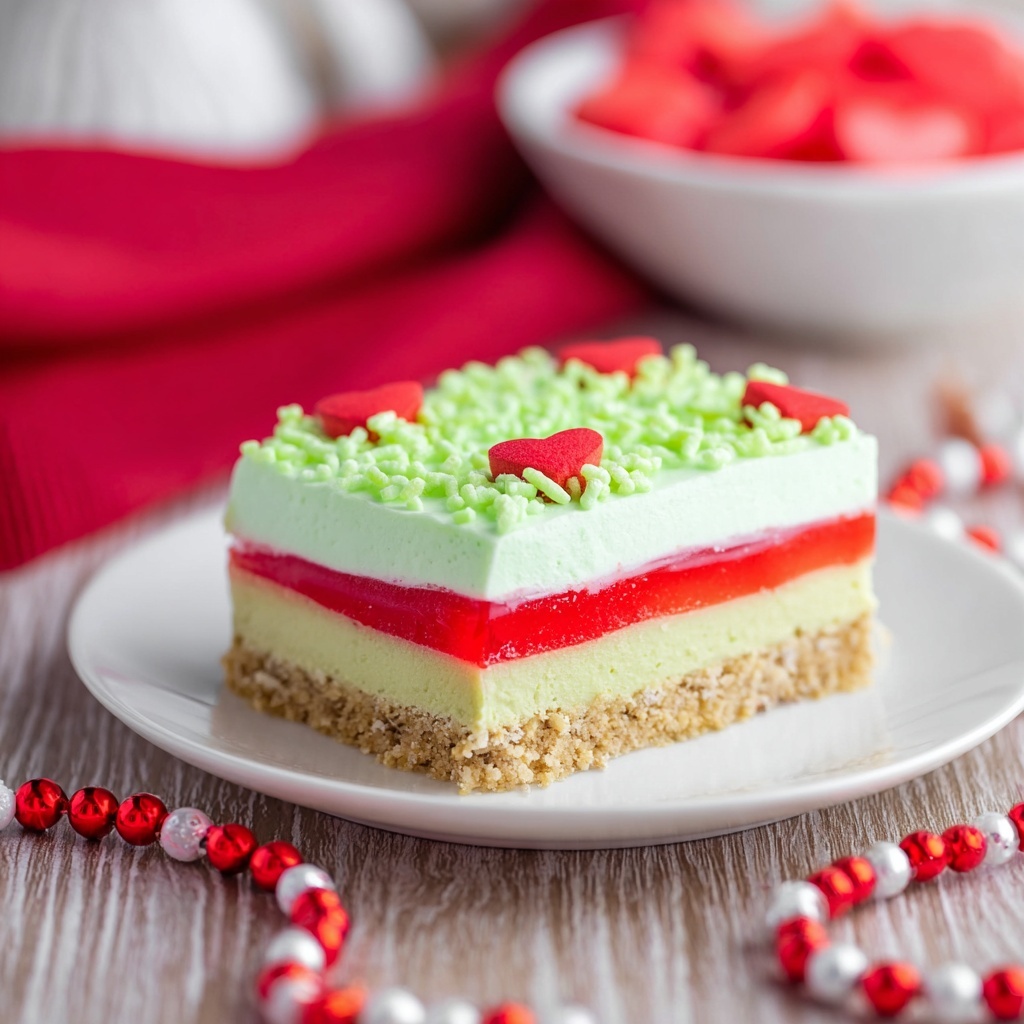
If you’re searching for a dessert that perfectly blends festive fun with creamy indulgence, look no further than this Grinch Cheesecake Lush Recipe. This no-bake layered delight brings together the crunch of vanilla oreo crust, the smooth tang of peppermint-infused cheesecake, and whimsical green and red layers that capture the holiday spirit in every bite. It’s a crowd-pleaser that’s as delightful to make as it is to share with loved ones.
Ingredients You’ll Need
Getting the ingredients together for this Grinch Cheesecake Lush Recipe is refreshingly straightforward. Each component plays a key role in creating that dreamy texture and vibrant color that makes this dessert truly special.
- Vanilla Oreo cookies (36): The base of your crust, these add a sweet crunch and subtle vanilla flavor that sets the tone.
- Butter (6 tablespoons, melted): Binds the cookie crumbs together perfectly for a firm, buttery crust.
- Cream cheese (8 ounces, softened): Adds rich, creamy body to the cheesecake layer for that classic tang.
- Powdered sugar (1 cup): Sweetens and smooths the cream cheese mixture beautifully.
- Whipped topping (16 ounces total): Lightens the dessert layers, giving them a fluffy, airy texture.
- Vanilla instant pudding mix (2 boxes, 3.4 ounces each): Creates the luscious, thick middle layer with that velvety mouthfeel.
- Cold milk (2 ½ cups): Blends with pudding mix to create the silky middle layer.
- Peppermint extract (1 teaspoon): Adds a refreshing, minty twist perfect for a Grinch-themed treat.
- Green and red food coloring: Bring in the iconic holiday colors that make this dessert come alive visually.
- Green and heart sprinkles: The festive finishing touch that adds fun texture and charm on top.
How to Make Grinch Cheesecake Lush Recipe
Step 1: Prepare Your Pan and Crust
Start by lining a 9×13-inch baking dish with parchment paper if you want easier slicing later—it’s a handy trick but not absolutely necessary. Then, crush all 36 vanilla Oreo cookies into fine crumbs using a food processor. Mixing the cookie crumbs with 6 tablespoons of melted butter creates the foundation, which you press firmly into the bottom of your dish for that perfect crunchy base.
Step 2: Make the Cream Cheese Layer
Next, whip together the softened cream cheese and powdered sugar using an electric mixer until the mixture is completely smooth and velvety. Folding in one container of whipped topping lightens this layer, giving it fluff and volume. Add green food coloring a few drops at a time until you reach your desired shade of Grinch green. Gently spread this vibrant cream cheese layer evenly over the cookie crust.
Step 3: Prepare the Peppermint Pudding Layer
In a separate bowl, whisk the two boxes of vanilla instant pudding with 2 ½ cups of cold milk until thickened. Stir in the peppermint extract for that festive flavor punch. Add red food coloring sparingly until you get a lovely, festive red hue. This bold-colored pudding mixture is carefully spread over the cream cheese layer, creating a truly eye-catching contrast.
Step 4: Finish with Whipped Topping and Sprinkles
Mix the remaining whipped topping container with green food coloring until it matches the shade of your bottom cheesecake layer. This final layer adds a soft, cloud-like top that completes the lush trifecta. Sprinkle green and heart-shaped sprinkles generously over the whipped topping to add whimsy and holiday cheer. Refrigerate for at least four hours or freeze if you want to speed up the process before slicing and serving.
How to Serve Grinch Cheesecake Lush Recipe
Garnishes
The beauty of this Grinch Cheesecake Lush Recipe is that it’s already festive, but you can amp up the presentation with a few extra touches. Try adding fresh mint leaves or a dusting of edible glitter for a sparkling, magical finish that will make your guests’ eyes light up with delight.
Side Dishes
While this dessert is rich and filling, pairing it with something light and refreshing like a crisp citrus salad or even a scoop of plain vanilla ice cream can create a balanced flavor experience that cleanses the palate between each indulgent bite.
Creative Ways to Present
If you want to really wow your friends or family, serve the Grinch Cheesecake Lush Recipe in clear individual cups to showcase those iconic colorful layers. Alternatively, cut it into fun Grinch-shaped cookies or use cookie cutters after slicing to present on a festive holiday dessert board with other seasonal treats.
Make Ahead and Storage
Storing Leftovers
This dessert stores beautifully in the refrigerator. Keep it covered with plastic wrap or foil to maintain its moisture and prevent it from absorbing other fridge odors. Leftovers are best enjoyed within 3 to 4 days for optimal freshness and flavor.
Freezing
You can freeze the Grinch Cheesecake Lush Recipe if needed—wrap it tightly in plastic wrap and then in aluminum foil to avoid freezer burn. When properly stored, it keeps well for up to one month. Just be sure to thaw it in the refrigerator overnight before serving.
Reheating
Since this is a no-bake chilled dessert, reheating isn’t recommended. Instead, allow it to come to a perfect chilled temperature in the fridge so every creamy layer shines just as intended.
FAQs
Can I use a different type of cookie for the crust?
Absolutely! While vanilla Oreos provide a perfect flavor and texture, you can experiment with chocolate Oreos or even graham crackers for a slightly different twist, just keep the quantities similar for the right crust consistency.
Is the peppermint extract necessary?
Peppermint extract adds a wonderful holiday vibe and balances the sweetness, but if you’re not a fan, you can reduce or omit it to suit your taste preferences without drastically changing the texture.
What if I don’t have green or red food coloring?
You can still make the dessert without food coloring, but the layers won’t have that classic Grinch look. Natural alternatives like spinach powder for green or beet juice for red can work if you prefer natural ingredients.
Can I make this dessert vegan or dairy-free?
With some ingredient swaps like dairy-free cream cheese, non-dairy whipped topping, and plant-based milk, you can create a vegan-friendly version, though the texture might vary slightly. Instant pudding mixes sometimes contain dairy, so look for vegan-certified options.
How long does it take to set properly?
For the best texture, refrigerate the Grinch Cheesecake Lush Recipe for at least 4 hours so all the layers become firm and flavors meld. If you’re in a hurry, freezing speeds up this process but thaw before serving.
Final Thoughts
I truly hope you give the Grinch Cheesecake Lush Recipe a try this holiday season because it’s the perfect blend of fun, flavor, and festivity. It’s ridiculously easy to make but impressively tasty and colorful, which makes it a guaranteed hit for any gathering. Once you take that first bite, you’ll be hooked on this whimsical, creamy delight that’s as joyful to share as it is to eat.
Print
Grinch Cheesecake Lush Recipe
- Prep Time: 5 minutes
- Cook Time: 0 minutes
- Total Time: 4 hours 5 minutes (including chilling time)
- Yield: 8 servings
- Category: Dessert
- Method: No-Cook
- Cuisine: American
Description
A festive and no-bake Grinch Cheesecake Lush dessert featuring layers of crushed vanilla Oreo crust, creamy green-tinted cream cheese, peppermint-flavored vanilla pudding, and whipped topping, decorated with colorful sprinkles. Perfect for holiday gatherings and easy to prepare ahead.
Ingredients
Crust
- 36 vanilla Oreo cookies
- 6 tablespoons butter, melted
Cream Cheese Layer
- 8 ounces cream cheese, softened
- 1 cup powdered sugar
- 16 ounces whipped topping (divided into 2 containers)
- Green food coloring
Pudding Layer
- 2 boxes (3.4 ounces each) vanilla instant pudding mix
- 2 ½ cups cold milk
- 1 teaspoon peppermint extract
- Red food coloring
Topping & Decoration
- Green food coloring (additional, for whipped topping)
- Green and heart sprinkles
Instructions
- Prepare the dish: Line a 9×13-inch baking dish with parchment paper to facilitate easier slicing, though this step is optional.
- Crush the cookies: Using a food processor, pulse all the vanilla Oreo cookies until fine crumbs form.
- Mix crust: Transfer the cookie crumbs into a large bowl and combine with the melted butter, stirring until thoroughly blended.
- Press crust: Evenly press the cookie mixture into the bottom of the prepared 9×13 glass baking dish to form the crust.
- Make cream cheese layer: In a large bowl, use an electric mixer to beat the softened cream cheese and powdered sugar together until smooth and creamy.
- Add whipped topping and color: Fold one container (8 ounces) of whipped topping into the cream cheese mixture. Add green food coloring gradually until the desired shade of green is achieved.
- Spread cream cheese layer: Gently spread the green cream cheese mixture evenly over the cookie crust layer.
- Prepare pudding layer: In a medium bowl, whisk together the two boxes of dry vanilla instant pudding mixes with 2 ½ cups cold milk until fully combined and thickened slightly.
- Add peppermint and color: Stir in 1 teaspoon of peppermint extract. Then add red food coloring until the pudding has your preferred shade of red.
- Spread pudding layer: Carefully spread the red-colored pudding mixture evenly over the cream cheese layer.
- Color remaining whipped topping: Mix the remaining container of whipped topping with green food coloring until it matches the green shade of the bottom cream cheese layer.
- Top with whipped topping: Spread the green whipped topping gently over the pudding layer to cover completely.
- Decorate: Sprinkle the top generously with green and heart-shaped sprinkles for a festive touch.
- Chill: Refrigerate the assembled dish for at least 4 hours or freeze to set the layers firmly.
- Serve: Slice the cheesecake lush into portions and serve chilled for a delightful holiday dessert experience.
Notes
- For easier slicing, lining the dish with parchment paper is recommended but optional.
- Ensure the cream cheese is fully softened for a smooth cream cheese layer without lumps.
- Adjust food coloring quantities to achieve your desired color intensities for both green and red layers.
- This dessert can be made a day in advance and stored in the refrigerator to let flavors meld beautifully.
- Freezing speeds up firming but let it thaw slightly before slicing for clean cuts.
