Description
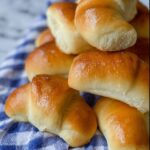
These Big Fat Crescent Rolls are soft, buttery, and delightfully fluffy homemade rolls perfect for any meal or occasion. Made with warm milk, butter, yeast, and plenty of flour, these crescent rolls feature a rich texture and golden brown crust, achieved through careful rising and baking. Brushed generously with melted butter before and after baking, they are irresistible warm and fresh, with a tender crumb and flaky layers. Ideal for family dinners, holiday spreads, or as a comforting snack, these rolls are a crowd-pleaser that fills your kitchen with a heavenly aroma.
Ingredients
Scale
Yeast Mixture
- 2 tablespoons active dry yeast
- 1/2 cup warm water (about 105°F)
Dough
- 2 cups warm milk (about 105°F)
- 1/2 cup butter (1 stick), softened
- 1/4 cup sugar
- 2 teaspoons salt
- 2 large eggs
- 7 cups all-purpose flour (plus extra for kneading and surface)
For Brushing
- 1/2 cup butter (1 stick), melted
Instructions
- Activate Yeast: In a large bowl or stand mixer bowl, combine the active dry yeast with warm water (about 105°F). Let it sit for 5 minutes until it becomes bubbly and foamy, indicating the yeast is alive.
- Warm Milk and Butter: In a glass measuring cup, warm 2 cups of milk with 1 stick of butter in 30-second intervals until butter softens and the milk is warm but not hot (around 105°F).
- Combine Liquids: Pour the warmed milk and butter mixture into the yeast mixture bowl.
- Add Sugar and Salt: Stir in the sugar and salt using the paddle attachment if using a stand mixer.
- Add Eggs: Beat in the two large eggs thoroughly to incorporate.
- Add Flour: Gradually add 7 cups of all-purpose flour, one cup at a time, mixing after each addition. The dough will be loose and sticky. Continue mixing for 2 minutes on medium speed.
- First Rise: Remove the paddle attachment, cover the bowl with greased plastic wrap, and let the dough rise in a warm place for 1 hour, until it has expanded but not overflowed the bowl.
- Prepare Baking Sheets: Line four large baking sheets with silicone baking mats or parchment paper, or grease them well with nonstick spray.
- Punch Down Dough: Use the mixer paddle or your hands to gently punch down the dough to release air bubbles.
- Knead Dough: Transfer dough to a heavily floured surface (about 1/2 cup flour). Flour your hands and knead the dough a few times until manageable, adding up to an additional 1/2 cup flour if needed to reduce stickiness without making the dough dry.
- Divide Dough: Using a floured serrated knife, divide the dough into 4 equal pieces. Place 3 pieces on a floured surface and cover with a tea towel to prevent drying out.
- Roll Out Dough: Roll out the 4th piece into a 12-inch circle on a floured surface, being careful not to make it too large to avoid overly long rolls.
- Butter the Dough: Melt 1/2 cup butter in a small bowl and brush it generously over the rolled dough circle.
- Cut Triangles: Using a pizza cutter, cut the dough circle into 8 equal triangular wedges, like slicing a pizza.
- Shape Rolls: Starting from the wide end of each triangle, roll it up towards the point, stretching the skinny end gently as you roll to create layers. If the wide end is too long, make a small snip in the middle and fold it to create a fatter roll instead of a long one.
- Arrange Rolls: Place the shaped rolls on the prepared baking sheets about 2 inches apart, with the tip of each triangle tucked underneath.
- Second Rise: Cover rolls with a tea towel and let them rise for at least 30 minutes or longer if your kitchen is cooler.
- Preheat Oven: Preheat your oven to 375°F while the rolls rise.
- Continue Shaping: Repeat rolling, buttering, cutting, and shaping steps with the remaining dough pieces, keeping track of pans to manage rising time evenly.
- Bake Rolls: Bake the rolls in the preheated oven for 12-15 minutes until golden brown on top and bottom. Bake two pans at a time if needed and rotate pans halfway through baking (after 6-7 minutes) for even cooking.
- Brush with Butter: Immediately after baking, brush the hot rolls with melted butter to add shine and flavor.
- Serve and Store: Enjoy the rolls fresh and warm, or if serving later, brush with melted butter just before serving to avoid wrinkling the crust.
- Reheat Instructions: To reheat, warm the rolls on a baking sheet at 170°F for 5-10 minutes.
- Freezing Instructions: Freeze rolls up to 3 weeks in ziplock bags. Thaw at room temperature in the sealed bag and reheat as instructed. For best results, brush melted butter only before serving after freezing.
Notes
- Ensure the water and milk are warm, not hot, to avoid killing the yeast.
- The dough will be sticky; don’t add too much flour or the rolls will be dense.
- Letting the dough rise in a warm place is critical for proper texture and fluffiness.
- Use a serrated knife dusted with flour to cut the dough cleanly.
- Stretching the skinny end of the triangle before rolling gives more layers and a prettier roll.
- Butter brushing before and after baking adds flavor and a golden crust.
- If freezing, do not brush butter before freezing to avoid wrinkling.
- Rotate pans during baking to ensure even heat distribution.