“`html
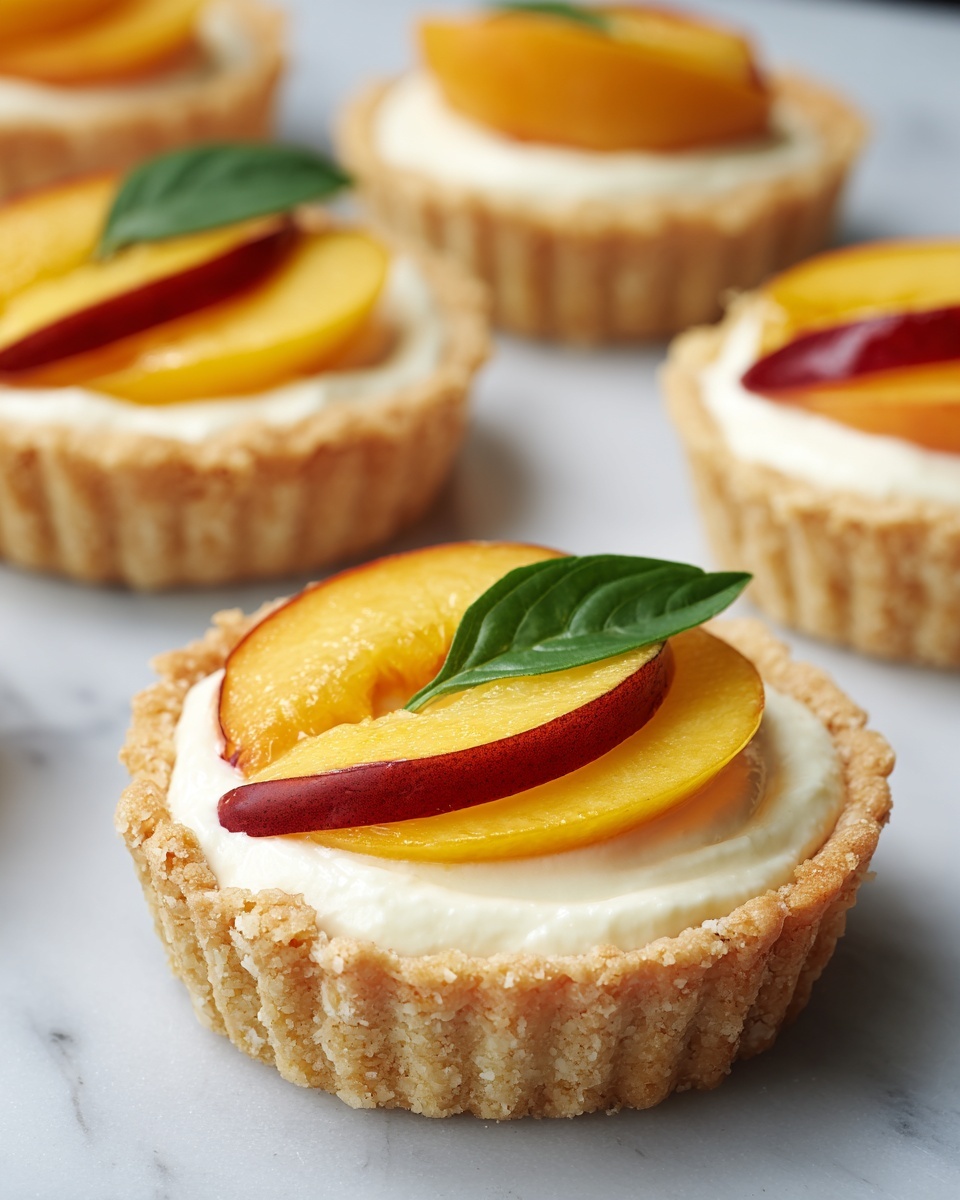
If you’ve ever craved a dessert that feels like a tender hug of summer sunshine, look no further than this Mini Peach and Cream Cheese Tarts Recipe. These charming little tarts combine a crisp, buttery crust with a luscious, cinnamon-kissed cream cheese filling, all crowned by juicy peaches that sing with sweetness. Whether you’re serving them at a family gathering, a picnic, or just indulging in a cozy moment at home, these tarts bring a sparkle of delight that’s simply unforgettable.
Ingredients You’ll Need
The beauty of this Mini Peach and Cream Cheese Tarts Recipe lies in its straightforward ingredients, each contributing a unique flavor and texture that makes every bite magical. From the delicate flakiness of the pie crust to the creamy richness of the filling and the fresh pop of peach, every component plays its part perfectly.
- Refrigerated pie crusts (or homemade pie dough): A flaky and buttery base that forms the perfect sturdy shell for your tarts.
- Cream cheese, softened: This is the creamy, smooth heart of the filling, lending richness without overpowering the peaches.
- Powdered sugar: Adds just the right amount of sweetness, dissolving effortlessly into the cream cheese for velvety texture.
- Vanilla extract: Adds a warm, aromatic note that enhances the overall flavor without stealing the spotlight.
- Ground cinnamon: Just a touch brings subtle spice that beautifully complements the peaches and cream cheese.
- Peach slices in syrup or fresh peaches: The star of the show—juicy, fragrant, and naturally sweet.
- Peach preserves or apricot jam (optional): Used as a glaze for a glossy, professional finish and extra fruity punch.
How to Make Mini Peach and Cream Cheese Tarts Recipe
Step 1: Preheat and Prepare Your Baking Gear
Start by warming up your oven to 375°F (190°C). This ensures your tart shells begin baking immediately, helping them achieve that golden, tender crunch that is oh-so-important for a perfect Mini Peach and Cream Cheese Tarts Recipe.
Step 2: Shape the Tart Shells
Roll out the pie crusts and carefully cut out circles to fit your mini tart pans or muffin tin. This step is fun because you get to see the shape of your future tarts come to life. Press the dough gently into the pans, making sure the edges are even but not too thick.
Step 3: Blind Bake the Crusts
Place your tart pans on a baking sheet and bake the crusts for 10 to 12 minutes, or until they turn beautifully golden brown. This crucial step ensures a crisp shell that holds its shape and keeps the filling delightful without sogginess.
Step 4: Whip Up the Cream Cheese Filling
While the crusts cool, beat together softened cream cheese, powdered sugar, vanilla extract, and ground cinnamon until smooth and silky. This aromatic, sweet filling is where the magic of the Mini Peach and Cream Cheese Tarts Recipe truly begins to shine — its creamy texture balancing perfectly with the peaches.
Step 5: Assemble the Tarts
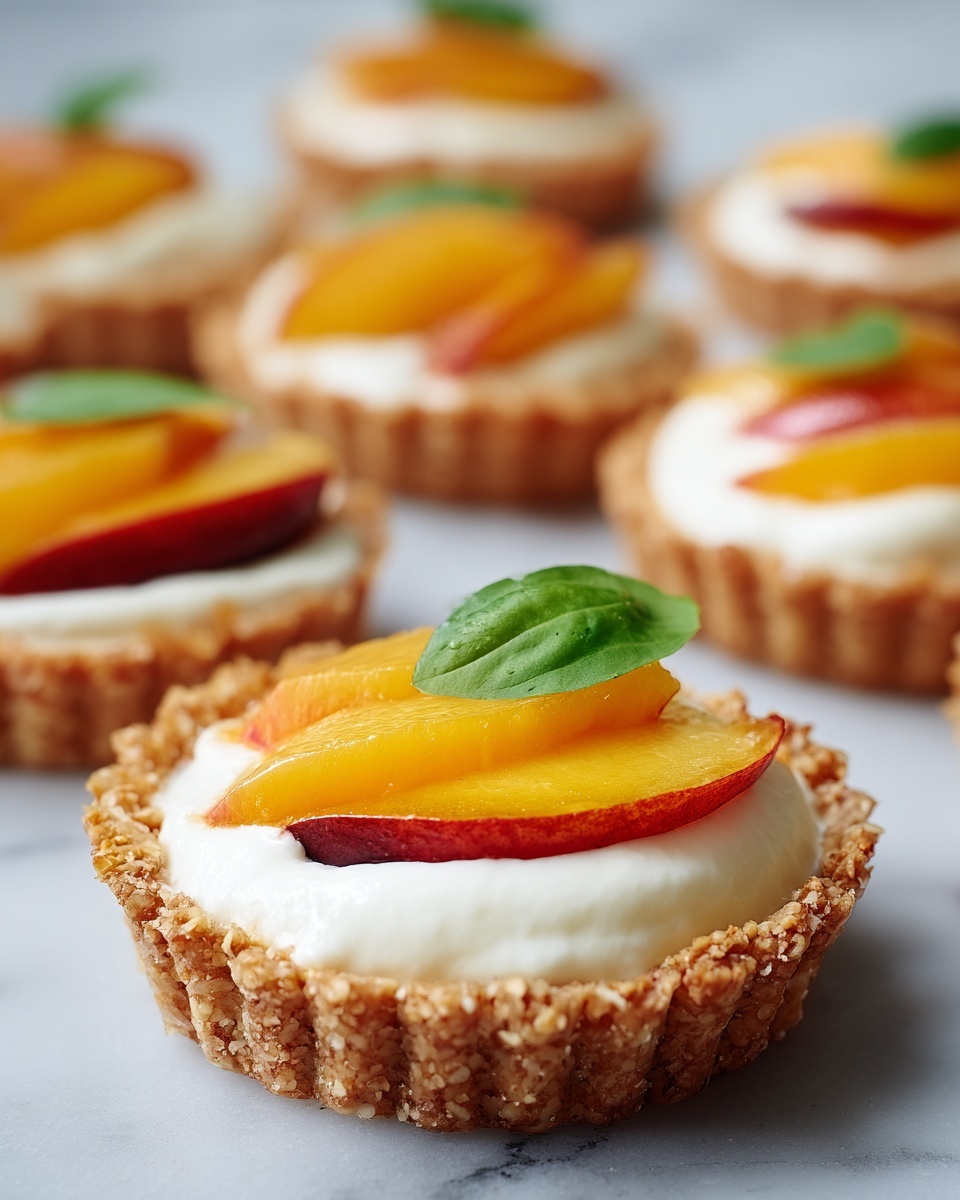
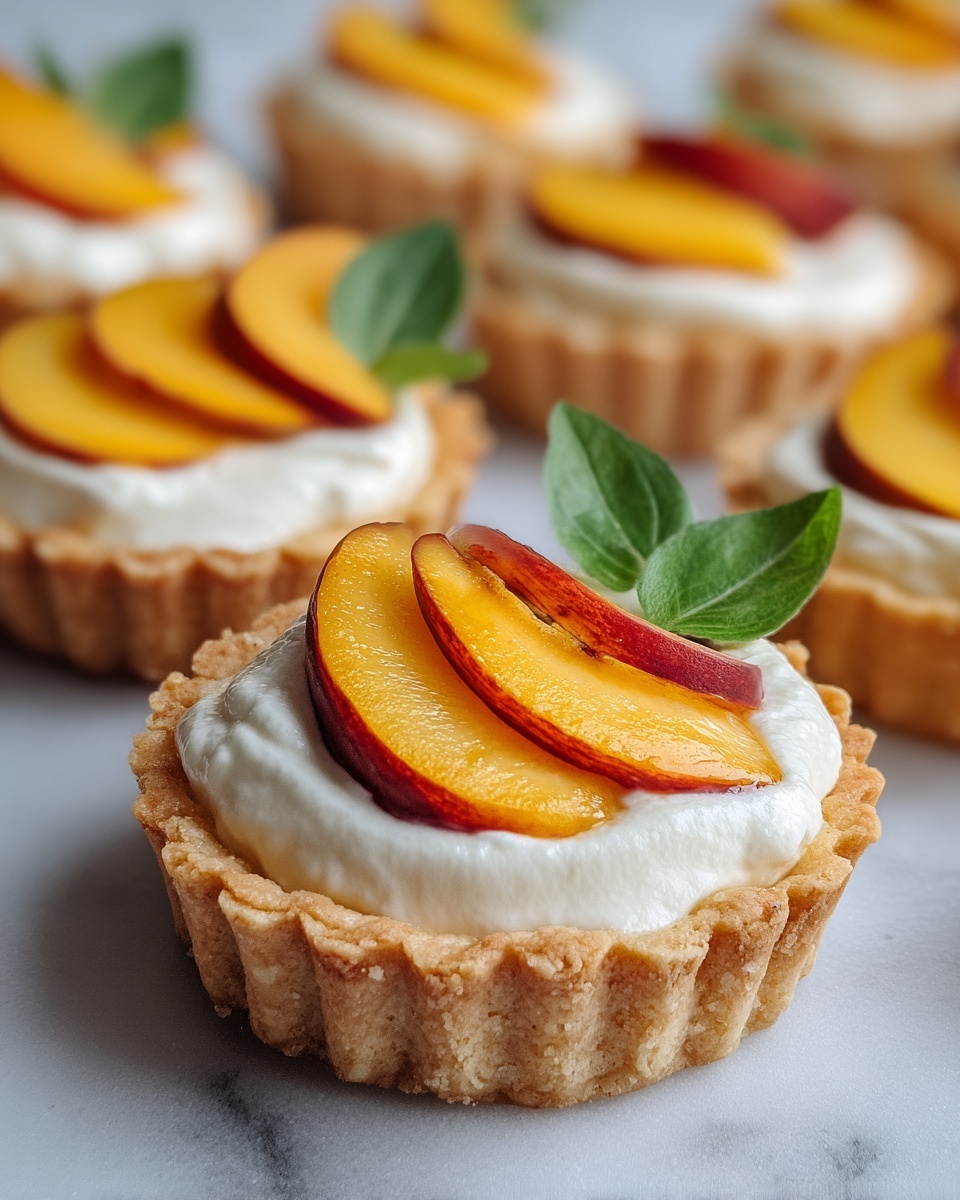
Spoon a generous dollop of the cream cheese mixture into each cooled tart shell. Then, lovingly arrange peach slices over the filling, layering them to create a visual delight and ensure every bite bursts with peach flavor.
Step 6: Add the Glaze
For a final flourish, gently warm your peach preserves or apricot jam and brush it over the peach slices. This adds a shining glaze that catches the light and seals in fresh flavor for a professional touch that’s easy to achieve.
Step 7: Chill Before Serving
Pop your assembled tarts in the refrigerator for at least an hour. This chilling time lets the flavors mingle, the filling firm up just right, and your Mini Peach and Cream Cheese Tarts Recipe reach their full, crowd-pleasing potential.
How to Serve Mini Peach and Cream Cheese Tarts Recipe
Garnishes
A sprinkle of freshly ground cinnamon or a few mint leaves instantly elevate the tarts’ appearance and aroma. For a little extra indulgence, a dusting of powdered sugar or a light drizzle of honey can add a delicate sweetness without overpowering the fresh peach flavors.
Side Dishes
These mini tarts pair wonderfully with a scoop of vanilla bean ice cream or a dollop of freshly whipped cream. If you’re aiming for a brunch presentation, consider serving alongside fresh berries or a light citrus salad to complement the peaches’ natural sweetness.
Creative Ways to Present
Arrange your Mini Peach and Cream Cheese Tarts Recipe on a pretty platter lined with edible flowers or peach leaves for a stunning centerpiece. Alternatively, place each tart in a delicate paper cup or decorative mini muffin liner to make them even more inviting and easy to share.
Make Ahead and Storage
Storing Leftovers
If you find yourself with any leftover tarts, no worries! Store them in an airtight container in the refrigerator for up to 2 to 3 days. While the crust might soften slightly over time, the flavors remain just as delightful, making for a perfect next-day treat.
Freezing
To freeze these tarts, first freeze them uncovered on a baking sheet until firm. Then transfer the tarts to a freezer-safe container or bag and store for up to 1-2 months. For best texture, consider freezing the crusts and cream cheese filling separately and assemble with peaches just before serving.
Reheating
If you’ve frozen your Mini Peach and Cream Cheese Tarts Recipe, thaw them overnight in the refrigerator. Serve chilled for the best texture, or if you prefer a warm tart, gently reheat in an oven set to 300°F for about 5 to 10 minutes, watching carefully to avoid drying out the peaches.
FAQs
Can I use frozen peaches instead of fresh?
Absolutely! Frozen peaches work well as long as they’re fully thawed and drained. This helps prevent excess moisture from making your tart crust soggy and keeps that perfect texture intact.
Can I substitute other fruits in this recipe?
Yes! This Mini Peach and Cream Cheese Tarts Recipe is wonderfully flexible. Try swapping in berries, apples, or even mangoes to create new flavor twists that still highlight the creamy filling and flaky crust.
How can I make the filling more tart?
If you prefer a bit more tang, add a small splash of fresh lemon juice to the cream cheese mixture. This brightens the flavor and balances the natural sweetness of the peaches beautifully.
Can the cream cheese filling be prepared ahead of time?
Definitely! The cream cheese filling holds up well in the refrigerator for up to two days if stored in an airtight container. This makes assembling your Mini Peach and Cream Cheese Tarts Recipe quick and easy when ready to serve.
Are store-bought tart shells a good option?
Absolutely! Using store-bought tart shells is an excellent shortcut that still delivers great texture and flavor. Just make sure to choose sturdy shells that won’t crumble under the filling and topping.
Final Thoughts
I can’t recommend the Mini Peach and Cream Cheese Tarts Recipe enough for anyone looking to whip up a show-stopping dessert with minimal fuss. These tarts feel special but come together so easily, making every bite a joyful celebration of sweet peaches and creamy richness. Give this recipe a try, and I promise these adorable tarts will become one of your favorite go-to treats, perfect for sharing—or savoring all by yourself.
“`
Print
Mini Peach and Cream Cheese Tarts Recipe
- Prep Time: 15 minutes
- Cook Time: 12 minutes
- Total Time: 27 minutes plus 1 hour refrigeration
- Yield: 12 mini tarts
- Category: Dessert, Pastry
- Method: Baking
- Cuisine: American
- Diet: Vegetarian
Description
Mini Peach and Cream Cheese Tarts are a delightful dessert featuring buttery, flaky tart shells filled with smooth, sweetened cream cheese and topped with juicy peach slices. Perfect for parties, family gatherings, or a sweet treat, these tarts balance creamy and fruity flavors in a portable, bite-sized form.
Ingredients
Tart Shells
- 1 package refrigerated pie crusts (or homemade pie dough)
Cream Cheese Filling
- 8 oz cream cheese, softened
- 1/4 cup powdered sugar
- 1 teaspoon vanilla extract
- 1/2 teaspoon ground cinnamon
Topping
- 1 can peach slices in syrup, drained (or fresh peaches, sliced)
- 1 tablespoon peach preserves or apricot jam (optional, for glazing)
Instructions
- Preheat Oven: Preheat the oven to 375°F (190°C) to prepare for baking the tart shells.
- Prepare Tart Shells: Roll out the pie crust and cut into circles sized to fit mini tart pans or a muffin tin. Press the dough into the pans to form tart shells.
- Bake Tart Shells: Bake the tart shells for 10-12 minutes until they become golden brown and crisp. Remove from the oven and allow to cool completely.
- Make Cream Cheese Filling: While the crusts cool, beat softened cream cheese, powdered sugar, vanilla extract, and ground cinnamon together until smooth and creamy.
- Fill Tart Shells: Spoon a generous amount of the cream cheese mixture into each cooled tart shell.
- Add Peach Slices: Arrange peach slices neatly on top of the cream cheese filling. Fresh or canned peaches both work well.
- Glaze (Optional): Warm peach preserves or apricot jam briefly in the microwave, then drizzle over the peaches to create a glossy, attractive finish.
- Chill Before Serving: Refrigerate the assembled tarts for at least 1 hour to allow flavors to meld and the filling to firm up before serving.
Notes
- You can use fresh peaches during peach season for the best flavor and texture.
- Store leftover tarts in an airtight container in the refrigerator for up to 2 days for optimal freshness.
- For a gluten-free version, substitute with gluten-free tart shells.
- To avoid soggy crusts, drain canned peaches well and assemble tarts shortly before serving if possible.
- Softening the cream cheese before mixing ensures a smooth filling without lumps.

