
“`html
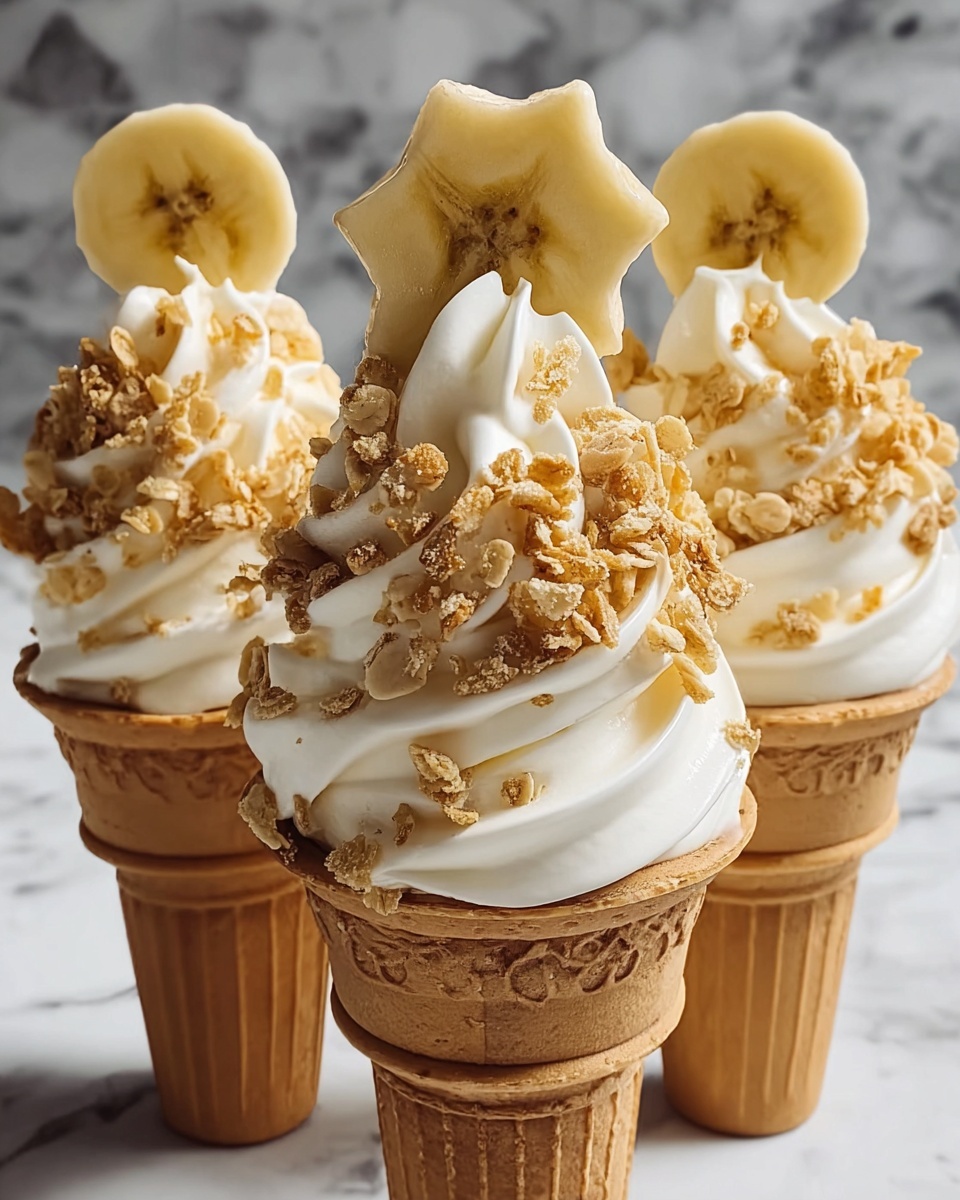
If you adore creamy, dreamy desserts that bring a nostalgic twist, then let me introduce you to the Banana Pudding Cheesecake Cones Recipe. This delightful treat combines velvety cheesecake filling with the classic flavors of banana pudding, all nestled inside crisp sugar cones for a fun, handheld indulgence. It’s the perfect way to enjoy a comforting dessert with a playful presentation that’s sure to wow at any gathering or simply brighten your day.
Ingredients You’ll Need
The beauty of this Banana Pudding Cheesecake Cones Recipe lies in its simple but impactful ingredients. Each one plays a special role, whether it’s providing richness, sweetness, or that signature banana flavor that makes this dessert so irresistible.
- Cream cheese, 8 oz: Softened for that creamy, tangy base that gives the cheesecake its signature smoothness.
- Granulated sugar, 1/2 cup: Sweetens the filling just right without overpowering the bananas.
- Vanilla extract, 1 tsp: Adds warmth and depth to the flavor, rounding out the sweetness beautifully.
- Heavy cream, 1 cup: Whipped to fluffy perfection, it lightens the cheesecake mix into a luscious cloud.
- Ripe bananas, 2: Mashed fresh to bring a natural fruitiness and that classic banana pudding charm.
- Vanilla wafers, 1 cup crushed: Adds delightful texture and a nostalgic crunch reminiscent of the original banana pudding.
- Sugar cones, 6: Crisp and sturdy enough to hold the creamy filling, making every bite fun and convenient.
How to Make Banana Pudding Cheesecake Cones Recipe
Step 1: Prepare the Cream Cheese Mixture
Start by placing the softened cream cheese, granulated sugar, and vanilla extract into a large mixing bowl. Beat everything together until you have a perfectly smooth and creamy mixture. This step is crucial because a smooth base ensures every bite melts in your mouth.
Step 2: Whip the Heavy Cream
In a separate bowl, whip the heavy cream until it forms stiff peaks. This whipped cream will lighten the cheesecake base, giving it that fluffy, airy texture that makes this dessert so heavenly.
Step 3: Fold Whipped Cream into Cream Cheese Mixture
Gently fold the whipped cream into the cream cheese mixture. Take your time here—fold slowly to keep the airiness intact, which results in a light, smooth filling that feels like a cloud in every bite.
Step 4: Add Mashed Bananas and Crushed Vanilla Wafers
Next, fold in the mashed bananas and crushed vanilla wafers carefully. The bananas lend natural sweetness and creaminess, while the wafers provide a delightful texture contrast that makes this recipe truly stand out.
Step 5: Fill the Sugar Cones
Now comes the fun part—spoon the cheesecake mixture into each sugar cone. Press gently as you fill to pack the mixture without squishing the cones. This ensures each cone is bursting with flavor and has the perfect balance of creamy filling and crunchy shell.
Step 6: Chill and Set
Place the filled cones upright in the refrigerator and let them chill for at least one hour. This chilling time allows the filling to set beautifully, making them easier to handle and simply irresistible to dig into.
Step 7: Serve and Enjoy
Once chilled, your Banana Pudding Cheesecake Cones Recipe is ready to bring smiles. Serve them cold straight from the fridge, and watch how quickly these charming cones disappear at your table.
How to Serve Banana Pudding Cheesecake Cones Recipe

Garnishes
To elevate your Banana Pudding Cheesecake Cones Recipe even more, consider topping them with a few crushed vanilla wafers or a small banana slice. A sprinkling of toasted coconut or a drizzle of caramel sauce also adds wonderful texture and an extra touch of sweetness.
Side Dishes
Pair these cones with a light fruit salad or a small cup of fresh berries to balance the rich flavors. A tall glass of cold milk or iced tea also complements this dessert perfectly, making it a refreshing end to any meal.
Creative Ways to Present
For an eye-catching presentation, stand the cones upright in a decorated box filled with crumpled parchment paper or a cone holder. You can even arrange them on a colorful platter garnished with banana leaves or edible flowers to impress your guests.
Make Ahead and Storage
Storing Leftovers
If you have any leftover Banana Pudding Cheesecake Cones Recipe, store them in an airtight container in the refrigerator. They will keep well for up to 2 days, but be aware the cones may soften slightly—still delicious but less crunchy.
Freezing
You can freeze the cheesecake filling separately in a freezer-safe container for up to 1 month. However, freezing the filled cones is not recommended as the texture of the cones may change dramatically when thawed.
Reheating
This dessert is best enjoyed chilled and does not require reheating. Serving it cold enhances the creamy texture and fresh banana flavor that make the Banana Pudding Cheesecake Cones Recipe so irresistible.
FAQs
Can I use refrigerated bananas for this recipe?
Yes, but make sure the bananas are ripe and soft for the best flavor and texture. Refrigerated bananas can turn brown faster, so mash them just before adding to keep the mixture fresh and vibrant.
Is it possible to substitute the sugar cones with waffle cones?
Absolutely! Waffle cones will add a different texture and a bit more sweetness, which pairs nicely with the cheesecake filling. Just ensure they are fresh and sturdy enough to hold the creamy mixture.
Can I make this recipe vegan?
To make it vegan, substitute the cream cheese and heavy cream with plant-based alternatives like coconut cream and vegan cream cheese. Keep in mind the texture and flavor will vary slightly but still be delightful.
How long does it take to chill the cones sufficiently?
The Banana Pudding Cheesecake Cones Recipe needs at least 1 hour in the refrigerator to set properly. Chilling longer won’t hurt and can help the flavors meld beautifully.
Can I prepare these cones for a party in advance?
Yes, prepare and fill the cones up to a day before your event, keep them refrigerated, and add fresh garnishes just before serving for maximum freshness and presentation.
Final Thoughts
If you’re looking for a show-stopping dessert that’s both nostalgic and innovative, you really must try the Banana Pudding Cheesecake Cones Recipe. It’s simple to make, irresistibly creamy, and so much fun to serve. Trust me, once you give this recipe a try, it will be your new go-to for impressing friends and indulging your own sweet tooth!
“`
Print
Banana Pudding Cheesecake Cones Recipe
- Prep Time: 15 minutes
- Cook Time: 0 minutes
- Total Time: 1 hour 15 minutes
- Yield: 6 servings
- Category: Dessert
- Method: No-Cook
- Cuisine: American
- Diet: Vegetarian
Description
Delight in these creamy Banana Pudding Cheesecake Cones, a fun and portable twist on classic banana pudding. Cream cheese and whipped cream blend with ripe bananas and vanilla wafers, all nestled inside crisp sugar cones for a delightful no-bake treat perfect for parties or a sweet snack.
Ingredients
Cheesecake Filling
- 1 package (8 oz) cream cheese, softened
- 1/2 cup granulated sugar
- 1 tsp vanilla extract
- 1 cup heavy cream
- 2 ripe bananas, mashed
- 1 cup vanilla wafers, crushed
Assembly
- 6 sugar cones
Instructions
- Prepare Cream Cheese Mixture: In a large mixing bowl, beat together the softened cream cheese, granulated sugar, and vanilla extract until the mixture is smooth and free of lumps, creating a creamy base for your cheesecake cones.
- Whip Heavy Cream: In a separate bowl, whip the heavy cream with an electric mixer until stiff peaks form, ensuring the cream is aerated and fluffy for folding into the mixture.
- Combine Mixtures: Gently fold the whipped cream into the cream cheese mixture with a spatula, taking care to maintain the airiness of the whipped cream for a light texture.
- Add Bananas and Wafers: Fold in the mashed ripe bananas and crushed vanilla wafers until evenly distributed throughout the cheesecake mixture.
- Fill the Cones: Carefully spoon the prepared cheesecake mixture into each sugar cone, pressing gently to pack the filling evenly but without breaking the cones.
- Chill: Place the filled cones upright in the refrigerator and chill for at least 1 hour to allow the cheesecake mixture to set and flavors to meld.
- Serve: Remove from the refrigerator and serve the Banana Pudding Cheesecake Cones chilled. Enjoy this creamy, crunchy, and fruity dessert!
Notes
- For best results, use ripe bananas as they provide natural sweetness and flavor.
- You can prepare the cheesecake mixture a few hours ahead and fill the cones just before serving to keep them crisp.
- To keep cones upright while chilling, use a cupcake pan or stand them in a container with rice or sugar.
- Crushed vanilla wafers add texture and classic banana pudding flavor but can be substituted with graham crackers if preferred.
- This recipe is best served within 24 hours to maintain cone crispness and freshness.


