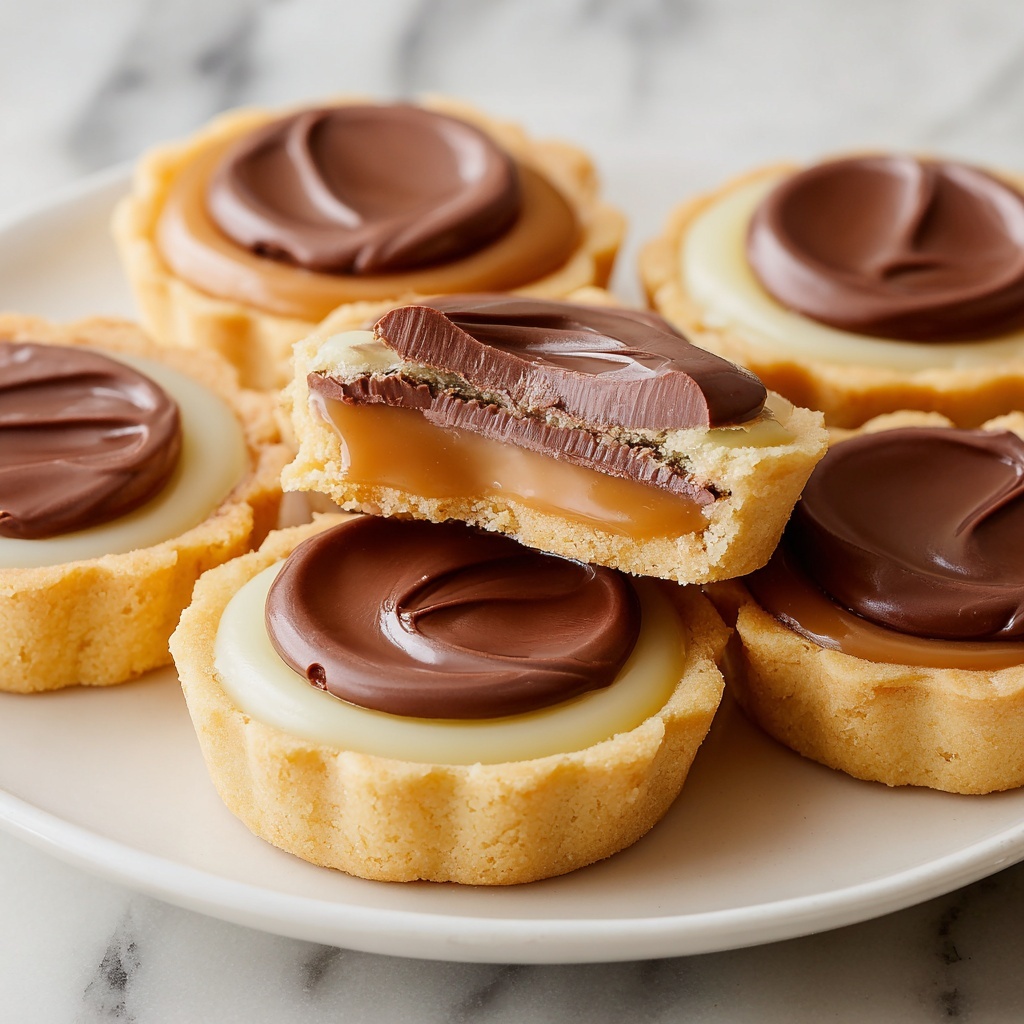
If you have a sweet tooth and love combining the classic flavors of caramel, chocolate, and cookie all in one bite, you absolutely must try this delightful Twix Cookie Cups Recipe. These little treats capture the essence of the iconic candy bar but with a homemade, fresh-baked twist that feels so special and satisfying. Perfectly buttery cookie cups hold a luscious caramel center topped with smooth, melted chocolate, creating a beautifully balanced dessert that’s as fun to make as it is to eat. Once you dive into this Twix Cookie Cups Recipe, you’ll find yourself reaching for more and more—they’re simply irresistible!
Ingredients You’ll Need
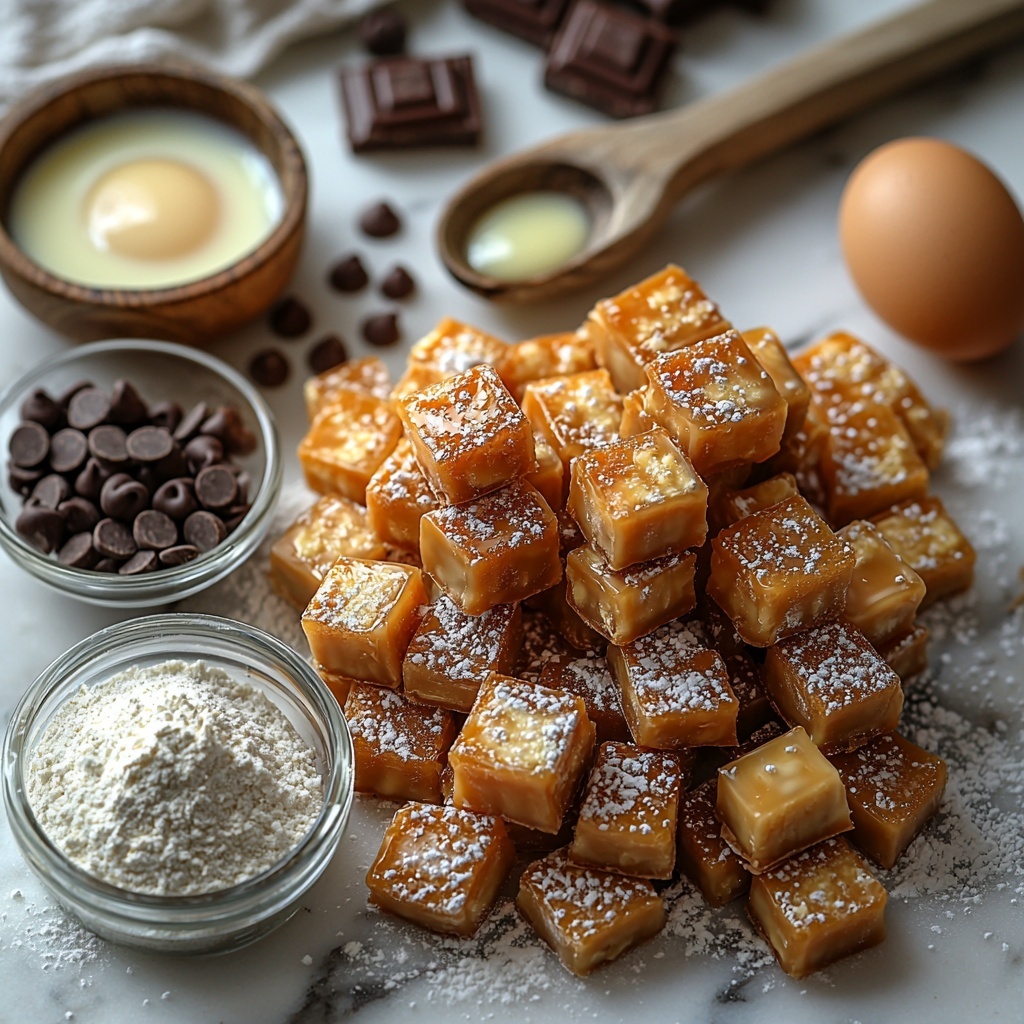
Gathering the ingredients for this recipe is surprisingly straightforward. Each component plays a crucial role, whether it’s creating the tender cookie base, the gooey caramel filling, or the luscious chocolate topping. These simple items come together to produce a wonderfully rich and satisfying treat.
- 1/2 cup salted butter: Provides that classic buttery richness and helps create a tender cookie texture.
- 1/2 cup granulated sugar: Adds sweetness and helps with the cookie’s light fluffiness.
- 1 tsp vanilla extract: Brings depth and warmth to the cookie dough flavor.
- 1 egg white: Binds the dough together without making it too dense.
- 1 1/2 cups all-purpose flour: The foundation for the cookie structure, making it sturdy yet soft.
- 1 tsp baking powder: Gives a slight lift, helping the cookie cups puff but still hold their shape.
- 20 caramels (unwrapped): The heart of the Twix Cookie Cups Recipe—gooey, sweet, and perfectly chewy caramel filling.
- 1 tbsp milk: Softens the caramel when melted, creating a smooth texture.
- 2 cups milk chocolate chips: The final touch—a creamy chocolate layer that seals everything with delicious sweetness.
How to Make Twix Cookie Cups Recipe
Step 1: Preparing Your Cookie Dough
Start by preheating your oven to 350°F (175°C), setting the stage for perfectly baked cookie cups. Then, cream together the salted butter and granulated sugar until the mixture becomes light and fluffy—that’s when you know the butter is well-incorporated, which is key for a tender bite. Mix in the egg white and vanilla extract next, ensuring a smooth, cohesive dough base.
Step 2: Adding Dry Ingredients
Now, gently fold in the all-purpose flour and baking powder. Mixing just until combined is essential here to keep the cookie cups light and tender rather than tough. Overmixing can lead to a dense texture, and we want each bite to melt in your mouth!
Step 3: Shaping and Baking the Cookie Cups
On a lightly floured surface, roll out your dough to about 1/4 inch thick—thin enough for delicate cups but sturdy enough to hold caramel and chocolate. Cut the dough into circles and place them on an ungreased baking sheet. Bake for 6-8 minutes until the cookies puff up slightly but still look matte. This ensures the cookie cups have enough structure to hold the fillings once cooled.
Step 4: Preparing the Caramel Filling
While your cookie cups cool completely on a wire rack, microwave the unwrapped caramels with milk for about one minute. Stir until the mixture becomes a smooth, luscious caramel sauce. This filling is the soul of the Twix Cookie Cups Recipe, so getting that texture just right matters!
Step 5: Assembling the Cookie Cups
Spoon a generous amount of the caramel filling onto each cooled cookie cup, spreading it evenly as you go. Pop them in the fridge to chill and set the caramel for about 10-15 minutes before moving on to the final step.
Step 6: Finishing with Chocolate
Melt the milk chocolate chips in short bursts, stirring in between for a silky smooth consistency. Spread the melted chocolate over each caramel-topped cookie cup and let everything set at room temperature or in the fridge until firm. This final layer seals in all those incredible flavors and textures.
How to Serve Twix Cookie Cups Recipe
Garnishes
If you want to add a little extra flair, sprinkle some crushed Twix bars or chopped nuts over the melted chocolate before it sets. A tiny pinch of sea salt can also heighten the flavor contrast, making the sweet components pop beautifully.
Side Dishes
These cookie cups shine on their own, but for a full dessert spread, pair them with a scoop of vanilla ice cream or a dollop of whipped cream. Fresh berries on the side add refreshing brightness that balances the richness perfectly.
Creative Ways to Present
For an eye-catching twist, serve your Twix Cookie Cups Recipe on a platter with edible gold leaf accents or drizzle additional chocolate in decorative swirls. You could also arrange them in mini cupcake liners for easy handling at parties or gatherings.
Make Ahead and Storage
Storing Leftovers
Keep your Twix Cookie Cups Recipe fresh by storing leftovers in an airtight container at room temperature. They will stay delicious for up to three days, allowing you to enjoy that homemade goodness beyond the first serving.
Freezing
If you want to save them for longer, these cookie cups freeze beautifully. Place them in a single layer on a baking sheet first, freeze until solid, then transfer to a freezer-safe container. When properly frozen, they can last up to one month without losing their wonderful taste and texture.
Reheating
To revive frozen Twix Cookie Cups, let them thaw at room temperature for about an hour. If you prefer the chocolate slightly melted, pop them in the microwave for 10-15 seconds, but be careful not to overheat and melt the caramel filling.
FAQs
Can I use salted or unsalted butter for this recipe?
Salted butter is preferred here as it adds a subtle flavor balance, but if you only have unsalted, just add a pinch of salt to the dough to replicate the right taste.
Is it okay to substitute dark chocolate for milk chocolate chips?
Absolutely! Dark chocolate will add a richer, more intense flavor that contrasts nicely with the sweet caramel and buttery cookie.
Can I make the cookie cups gluten-free?
Yes, you can swap the all-purpose flour for a gluten-free flour blend, but make sure it contains xanthan gum or another binder to help maintain the cookie’s structure.
What’s the best way to prevent the cookie cups from spreading too much while baking?
Chilling the dough before rolling it out helps, as does avoiding overmixing when incorporating the flour. Keeping the thickness consistent also ensures the cookie cups bake evenly without spreading.
Can I double this Twix Cookie Cups Recipe for a larger batch?
Definitely! This recipe scales well, just be sure to use larger baking sheets and watch baking times, as they might vary slightly with more cookies in the oven.
Final Thoughts
Once you try this Twix Cookie Cups Recipe, you’ll see why it quickly becomes a favorite. It’s a delightful blend of buttery cookie, chewy caramel, and creamy chocolate—all in one bite-sized treat that’s perfect for sharing or indulging solo. So go ahead, bake a batch and watch everyone’s faces light up with pure joy. Trust me, these little cups of happiness are well worth it!
Print
Twix Cookie Cups Recipe
- Prep Time: 10 minutes
- Cook Time: 8 minutes
- Total Time: 28 minutes
- Yield: 24 servings
- Category: Dessert
- Method: Baking
- Cuisine: American
Description
Delightfully sweet Twix Cookie Cups combine buttery cookie bases topped with smooth caramel and a rich milk chocolate layer, creating an irresistibly bite-sized treat perfect for parties or dessert platters.
Ingredients
Cookie Base
- 1/2 cup salted butter
- 1/2 cup granulated sugar
- 1 tsp vanilla extract
- 1 egg white
- 1 1/2 cups all-purpose flour
- 1 tsp baking powder
Caramel Topping
- 20 caramels (unwrapped)
- 1 tbsp milk
Chocolate Topping
- 2 cups milk chocolate chips
Instructions
- Preheat Oven: Set your oven to 350°F (175°C) to prepare for baking the cookie cups.
- Cream Butter and Sugar: In a mixing bowl, beat the salted butter and granulated sugar together until the mixture is light and fluffy, ensuring a smooth base.
- Add Wet Ingredients: Mix in the egg white and vanilla extract thoroughly until combined and smooth, preparing the dough for flour.
- Incorporate Dry Ingredients: Gradually add the all-purpose flour and baking powder to the mixture, stirring just until the dough comes together without overmixing.
- Form Dough Circles: Roll out the dough on a floured surface to about 1/4 inch thick, then use a cutter to cut circles suitable for cookie cups.
- Bake: Place the cookie circles on an ungreased baking sheet and bake for 6-8 minutes until the cookies puff up but are not glossy, indicating they are cooked through.
- Cool Cookies: Transfer the baked cookies onto a wire rack and let them cool completely to set the shape and texture.
- Prepare Caramel: Microwave the unwrapped caramels with 1 tablespoon of milk for one minute, stirring until the caramel mixture becomes smooth and creamy.
- Add Caramel Topping: Spoon the smooth caramel onto each cooled cookie cup, then place the cookie cups in the fridge for 10-15 minutes to chill and set the caramel layer.
- Melt Chocolate: Melt the milk chocolate chips in short intervals, stirring well each time until fully smooth and melted.
- Apply Chocolate Layer: Spread the melted chocolate over the caramel-topped cookie cups evenly and allow them to set before serving for the perfect finished treat.
Notes
- Ensure cookies are completely cooled before adding caramel to prevent melting and ruining the shape.
- Use an ungreased baking sheet to allow cookie cups to hold their form better.
- Microwave chocolate in 20-30 second intervals to avoid burning and achieve a smooth melt.
- Store finished cookie cups in an airtight container in the fridge to maintain freshness and texture.
- You can substitute milk chocolate chips with dark or white chocolate based on preference.
