
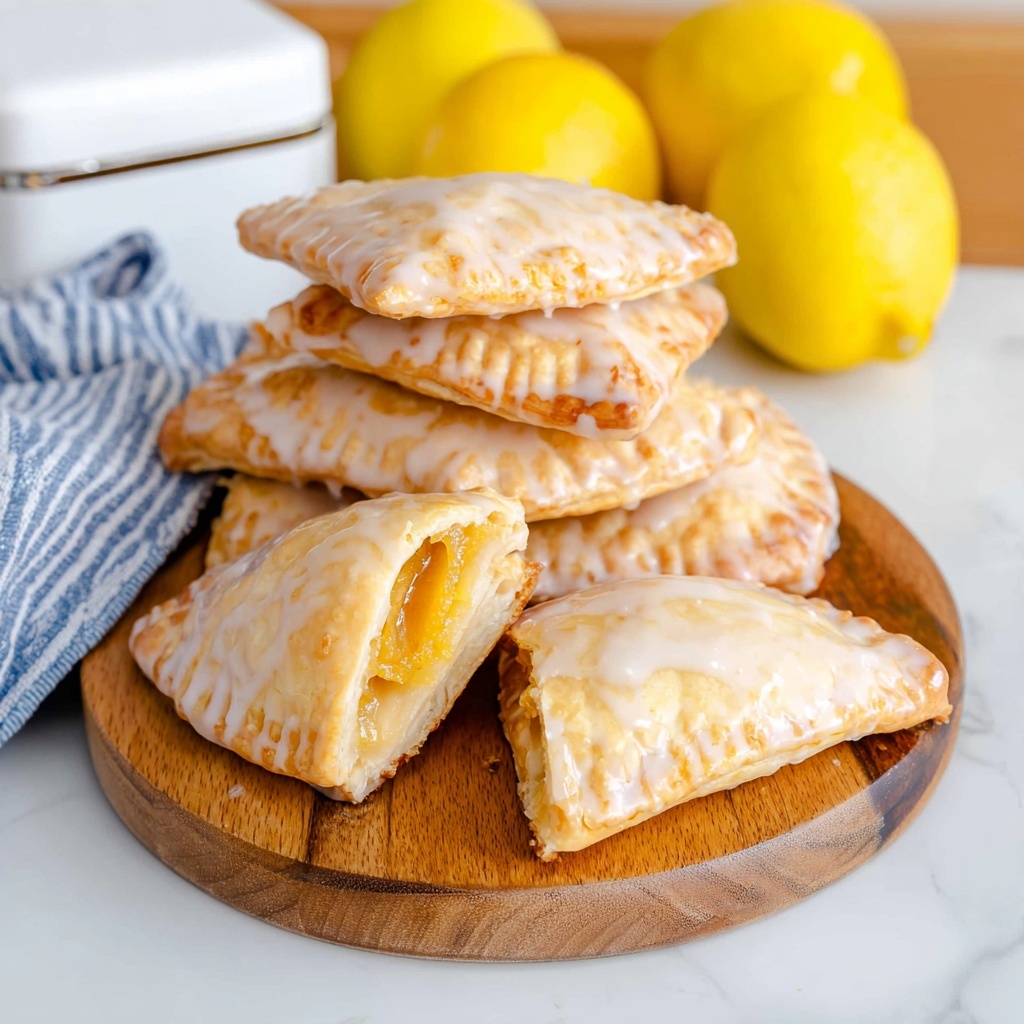
If you’re craving a delightful treat that balances tangy citrus with a flaky, buttery crust, look no further than this Lemon Hand Pies (Air Fryer or Baked) Recipe. These little pockets of sunshine are perfect for anytime you want a bite-sized dessert bursting with fresh lemon flavor. Whether you prefer the crispy edges the air fryer delivers or the golden, even finish from the oven, this recipe is wonderfully versatile and sure to become a favorite in your baking repertoire.

Ingredients You’ll Need
This Lemon Hand Pies (Air Fryer or Baked) Recipe keeps things delightfully simple, yet each ingredient plays a starring role. From the luscious homemade lemon curd to the buttery pie crust, every component combines to create those perfect pockets of citrus goodness.
- 2 cups Homemade Lemon Curd: The heart of the pies, providing that rich, tangy, and creamy filling that tastes like sunshine.
- 1 pie crust (package refrigerated): A ready-made shortcut for buttery, flaky perfection that cradles the lemon curd beautifully.
- 1 egg (beaten): This is your golden brush to give the pies a gorgeous shine and help seal them shut.
- 1 ½ cup powdered sugar: Used to create a sweet glaze that adds an irresistible glossy finish.
- 2 Tbsp milk (divided): One tablespoon for the egg wash and one for the glaze, adding smoothness and balancing sweetness.
- 1 tsp lemon zest: Gives an extra pop of fresh lemon aroma and flavor to the glaze.
- Cooking spray: To keep your air fryer basket or baking sheet nonstick and easy to clean.
How to Make Lemon Hand Pies (Air Fryer or Baked) Recipe
Step 1: Prepare Egg Wash and Lemon Glaze
Start by beating the egg with 1 tablespoon of milk in a small bowl—this will give your hand pies that shiny, golden crust. In another bowl, whisk together the powdered sugar, lemon zest, and the remaining milk until smooth to make a sweet lemon glaze you’ll drizzle on top after baking.
Step 2: Cut the Pie Crust
Roll out your pie crust if needed and cut it into 4-inch circles using a cookie cutter or the rim of a glass. Don’t throw away the scraps! You can gather and roll them out to cut additional circles, ensuring no dough goes to waste.
Step 3: Fill the Circles with Lemon Curd
Spoon about 1 heaping tablespoon of the homemade lemon curd right into the center of each dough circle. Be careful not to overfill, or it might leak out during cooking.
Step 4: Fold and Seal
Fold each circle in half, creating a half-moon shape that encloses the filling. Press the edges together and crimp with a fork or your fingers to seal the pies well and give them a charming edge.
Step 5: Brush with Egg Wash
Lightly brush the tops of the hand pies with the egg wash you prepared earlier. This simple step adds that signature golden color and helps the pies crisp up beautifully.
Step 6: Cook Your Lemon Hand Pies
If you’re air frying, spray the air fryer basket with cooking spray and arrange the pies in a single layer. Cook at 350°F for about 10-12 minutes until golden and puffed. If baking, place the pies on a parchment-lined baking sheet, spray or lightly brush with cooking spray, and bake in a preheated oven at 350°F for 18-22 minutes or until nicely browned.
Step 7: Cool Slightly and Glaze
Let your Lemon Hand Pies cool for a few minutes so the filling sets. Then, generously drizzle the lemon glaze over the warm pies to add a shiny, sweet finish that complements the tart filling perfectly.
Step 8: Serve and Enjoy
Your Lemon Hand Pies are now ready to be shared! Whether warm or at room temperature, they’re absolutely irresistible. These hand pies bring a cozy homemade touch to any occasion.
How to Serve Lemon Hand Pies (Air Fryer or Baked) Recipe
Garnishes
A sprinkle of powdered sugar or a few fresh mint leaves adds a lovely touch of elegance without stealing the show from those bright lemon flavors. For a little extra zest, you can also add a dusting of extra lemon zest right before serving.
Side Dishes
Pair these hand pies with a dollop of whipped cream or a scoop of vanilla ice cream to turn them into a decadent dessert. For a lighter option, a fresh green salad with mixed berries offers a refreshing contrast to the citrusy sweetness.
Creative Ways to Present
Serve these hand pies stacked in a pretty basket lined with a linen napkin for a charming tea party vibe. You can also position them on a dessert platter with lemon slices and edible flowers for a visually stunning centerpiece that will wow your guests.
Make Ahead and Storage
Storing Leftovers
Keep any leftover Lemon Hand Pies in an airtight container at room temperature for up to two days or refrigerate for up to four days. They hold their flavor and texture surprisingly well, making them a perfect quick snack or dessert.
Freezing
These hand pies freeze beautifully. Lay them on a baking sheet and freeze until solid, then transfer to a freezer bag or container. They’ll keep for up to 2 months. When you’re ready, just thaw and reheat for a fresh-baked taste.
Reheating
Reheat your hand pies in the oven or air fryer at 325°F for 5-7 minutes, or until warm and crispy. Avoid the microwave to keep that flaky crust intact and delicious.
FAQs
Can I use store-bought lemon curd for this recipe?
Absolutely! While homemade lemon curd adds a special touch, store-bought lemon curd works perfectly and saves time. Just make sure it’s thick enough to hold its shape inside the pies.
Which cooking method is better: air fryer or baked?
Both have their perks! The air fryer cooks faster and creates a crisp, golden crust with a slightly different texture, while baking gives an even, classic finish. Try both to see which you prefer!
Can I make these pies gluten-free?
Yes, by using a gluten-free pie crust, you can enjoy these hand pies without compromising on texture or flavor. Just handle the dough gently as gluten-free pastry can be more delicate.
How do I prevent the filling from leaking?
Make sure not to overfill and press the edges firmly when sealing. Brushing the edges with a little water before folding helps them stick better. Crimping with a fork also adds extra security.
Can I add other flavors to the lemon curd filling?
Definitely! A teaspoon of vanilla extract, a pinch of ginger, or even a little fresh thyme can add unique twists. Just be careful not to overpower that bright lemon flavor which is the star here.
Final Thoughts
There’s something truly special about the simplicity and brightness of this Lemon Hand Pies (Air Fryer or Baked) Recipe. It’s like a burst of sunshine wrapped in flaky pastry, perfect for sharing with loved ones or enjoying as a sweet self-treat. I can’t wait for you to try it and fall in love with these charming little delights!
Print
Lemon Hand Pies (Air Fryer or Baked) Recipe
- Prep Time: 10 minutes
- Cook Time: 22 minutes
- Total Time: 32 minutes
- Yield: 14 hand pies
- Category: Dessert
- Method: Air Frying
- Cuisine: American
- Diet: Vegetarian
Description
These delightful Lemon Hand Pies are a perfect blend of tangy lemon curd wrapped in flaky pie crust, finished with a sweet lemon glaze. You can prepare them either in the air fryer for a quicker, crispier result or baked in the oven for a classic, golden finish. Each hand pie is individually sized, making them perfect for parties, snacks, or desserts on the go.
Ingredients
Filling
- 2 cups Homemade Lemon Curd
Dough
- 1 pie crust (package refrigerated)
Glaze & Wash
- 1 egg (beaten)
- 1 ½ cup powdered sugar
- 2 Tbsp milk (divided)
- 1 tsp lemon zest
- Cooking spray
Instructions
- Prepare Egg Wash and Glaze: Beat the egg with 1 tablespoon of milk in a small bowl and set aside. In a separate bowl, whisk together the powdered sugar, lemon zest, and remaining 1 tablespoon of milk to create a lemon glaze. Set the glaze aside for later.
- Cut Dough Circles: Roll out the refrigerated pie crust and cut out 4-inch circles using a cookie cutter or a glass. Save the pastry scraps, re-roll, and cut additional circles until all dough is used.
- Fill the Dough: Place a heaping tablespoon of homemade lemon curd in the center of each dough circle, being careful not to overfill to avoid leakage during cooking.
- Form the Hand Pies: Fold each dough circle over to form a half-moon shape. Press the edges firmly to seal, then crimp with a fork or fingers for a decorative edge and better sealing.
- Apply Egg Wash: Lightly brush the top of each hand pie with the beaten egg wash to promote a beautiful golden color when cooked.
- Air Fry the Hand Pies: Preheat the air fryer to 350°F. Spray the basket lightly with cooking spray. Place hand pies in a single layer, leaving space between each. Air fry for 12-15 minutes or until golden brown and crisp. Remove and let cool slightly.
- OR Bake in Oven: Preheat oven to 375°F. Place the sealed hand pies on a parchment-lined baking sheet. Bake for 18-22 minutes, or until golden brown and cooked through. Remove and cool slightly.
- Glaze and Serve: Once the hand pies have cooled to warm but not hot, brush the prepared lemon glaze over the tops. Allow glaze to set for a few minutes before serving. Enjoy your fresh, tangy lemon hand pies!
Notes
- Use homemade or store-bought lemon curd depending on your preference or time availability.
- Make sure to not overfill the hand pies to prevent leaking during cooking.
- Air frying results in a crisper crust and quicker cook time, while baking gives a more traditional texture.
- Hand pies are best enjoyed the same day but can be stored covered at room temperature for up to 2 days.
- Reheat gently in an air fryer or oven for best texture retention.


