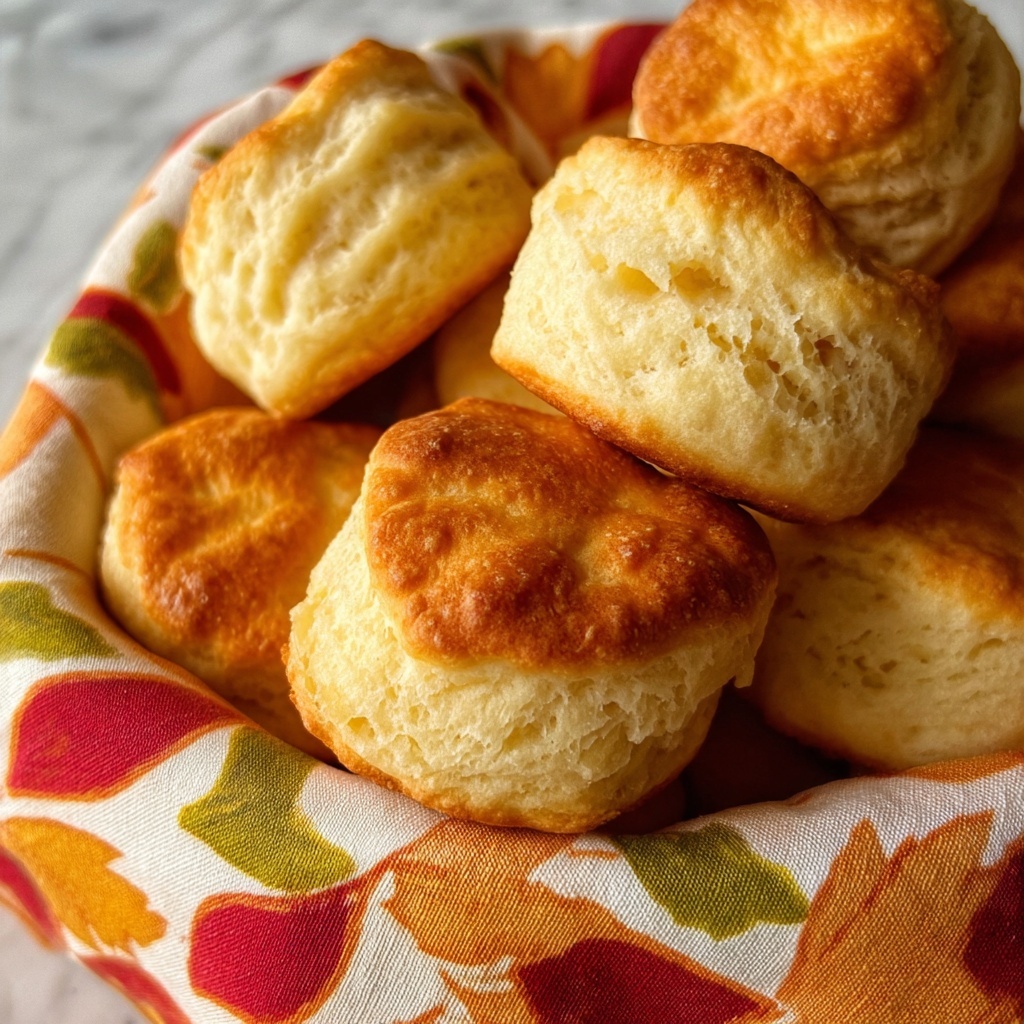
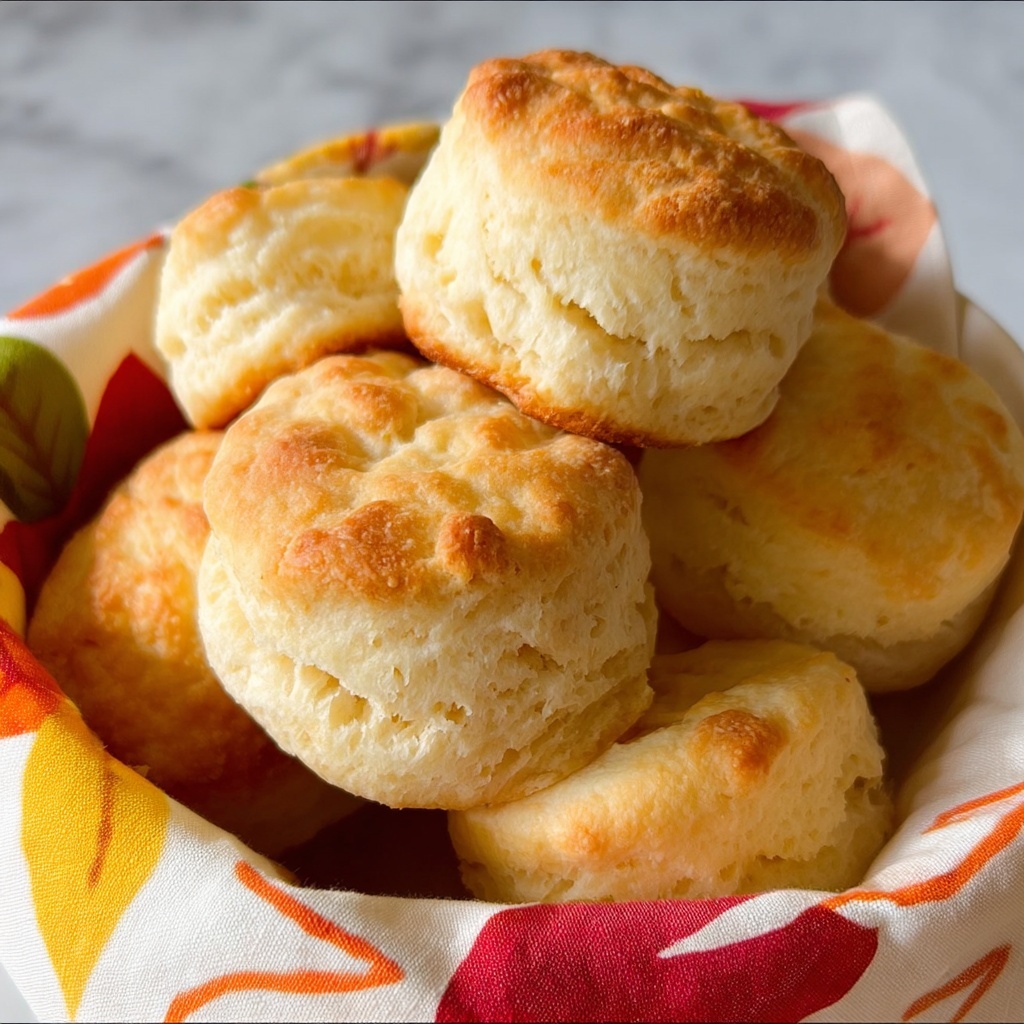
If you’re on the hunt for a warm, fluffy, and utterly irresistible bread that feels like a hug from the inside, then you have to try this Easy Yeast Rolls Recipe. These rolls are soft yet hearty, perfectly golden, and just the right combination of sweet and savory to complement any meal. Whether you’re a seasoned baker or a complete beginner, this recipe will guide you through making rolls that feel special but come together with the kind of ease everyone loves. Trust me, once you get the hang of this Easy Yeast Rolls Recipe, homemade rolls will become your go-to comfort food treasure.

Ingredients You’ll Need
One of the best parts about this Easy Yeast Rolls Recipe is how few and straightforward the ingredients are. Each one brings something irreplaceable to the table, from flavor and texture to that golden-brown color we adore.
- 1 tablespoon yeast: The magical leavening agent that gives your rolls lift and fluffiness.
- 1/4 cup warm water: Activates the yeast; it’s important this isn’t too hot or it will kill the yeast.
- 1 cup warm milk: Adds tenderness and keeps the dough rich.
- 3 tablespoons sugar: Feeds the yeast and adds a touch of sweetness to the crust.
- 1 and 1/2 teaspoons kosher salt: Balances sweetness and enhances overall flavor.
- 3 tablespoons shortening: Provides moisture and softness to every bite.
- 1 large egg: Enriches the dough and helps with structure.
- 2 & 1/4 cups + 2 tablespoons all-purpose flour: The foundation of your dough, giving it texture and body.
How to Make Easy Yeast Rolls Recipe
Step 1: Activate the Yeast
Begin by dissolving 1 tablespoon of yeast in 1/4 cup of warm water combined with 1 cup of warm milk. The warmth (about 105 degrees Fahrenheit) is crucial—too hot and you’ll kill the yeast, too cold and it won’t activate properly. Watch closely for bubbles forming; this bubbling means your yeast is alive and ready to make magic happen.
Step 2: Sweeten and Proof
Stir in 3 tablespoons of granulated sugar to give your yeast a feast. Allow the mixture to rest for about 5 minutes until you see the welcomed bubbles. This proofing step tells you that the yeast is working hard to help your rolls rise.
Step 3: Mix Initial Ingredients
Add 1 cup of flour to the yeast mixture along with 1 and 1/2 teaspoons kosher salt, 3 tablespoons shortening, and 1 egg. Use a paddle attachment or a sturdy spoon to beat the ingredients together until smooth. This will create a smooth base before adding the remaining flour.
Step 4: Add Remaining Flour and Beat Thoroughly
Next, incorporate the remaining 1 and 1/4 cups plus 2 tablespoons of flour. Beat this mixture well, scraping down the sides as you work to keep everything evenly combined. The dough will be stickier than you might expect—this is exactly what you want, so resist the urge to add more flour. This loose dough is key to fluffy, tender rolls.
Step 5: First Rise
Cover the bowl snugly and let the dough rise in a warm spot for 30 minutes. During this time, the dough will puff up beautifully, doubling in size as the yeast works its magic.
Step 6: Prepare for Baking
While the dough is rising, preheat your oven to 400 degrees Fahrenheit. This temperature will bake the rolls quickly, ensuring a golden crust and soft inside.
Step 7: Grease Your Muffin Tin
Spray a muffin tin generously with nonstick spray, focusing on every nook and cranny. This will prevent sticking and help the rolls release easily once baked.
Step 8: Portion the Dough
Spray a 1/4 cup measuring cup with nonstick spray or lightly grease it with butter. Scoop the sticky dough into the measuring cup, then carefully drop it into one muffin cavity. Oil your hands if needed to handle the dough without sticking.
Step 9: Fill and Smooth the Rolls
Fill each muffin cup evenly with dough. To create a neat top, flip each roll so the smoother side is up. A quick pat with a spoon or your oiled fingers will give the rolls a charming, smooth finish.
Step 10: Cover and Second Rise
Cover the tin with plastic wrap that’s been lightly sprayed with nonstick spray, so it won’t stick to the dough. Let the dough rise for another 20 minutes in a warm spot, such as the top of your fridge. If you have time, letting them rise a little longer makes the rolls even puffier and more inviting.
Step 11: Bake to Perfection
Bake the rolls at 400 degrees for 13 to 15 minutes. The tops should turn golden brown and you’ll see the bottoms starting to brown when you gently lift the edge of a roll. This browning signals the perfect bake for soft, flavorful rolls.
Step 12: Cool and Serve
Remove the rolls from the muffin tin as soon as they come out of the oven. Place them on a wire rack to cool slightly so the bottoms don’t become soggy. Serve warm with butter or jam to experience their fluffy, buttery goodness at its best.
How to Serve Easy Yeast Rolls Recipe
Garnishes
Simple butter is perfection itself when spread on warm yeast rolls, but don’t stop there. Flavored butters with herbs like rosemary or garlic add a sophisticated touch. A sprinkle of coarse sea salt or a dusting of powdered sugar gives a charming finish depending on whether you want sweet or savory.
Side Dishes
These rolls play nicely with just about any meal. Classic soups, hearty stews, or a fresh salad all benefit from a basket of these fluffy rolls. They soak up sauces beautifully, making every bite more satisfying.
Creative Ways to Present
For a fun take, serve these Easy Yeast Rolls Recipe in small baskets lined with a colorful napkin for a rustic vibe at your dinner table. Or slice and use them as slider buns for a bite-sized party treat. A little creativity can turn this humble roll into a showstopper.
Make Ahead and Storage
Storing Leftovers
Leftover yeast rolls keep best when tightly wrapped in plastic wrap or stored in an airtight container at room temperature. They stay soft for up to two days, making them perfect for next-day sandwiches or toast.
Freezing
If you want to enjoy these rolls for longer, freeze them once completely cooled. Place in a freezer-safe bag or container with parchment paper in between to prevent sticking. They freeze beautifully for up to three months without losing their softness.
Reheating
To bring frozen or leftover rolls back to life, warm them in a preheated oven at 350 degrees for 5 to 10 minutes wrapped in foil or uncovered for a slightly crispy crust. You can also pop them in the microwave for about 15 seconds when you’re in a hurry.
FAQs
Can I use butter instead of shortening?
Absolutely! Butter can be used in place of shortening for a richer flavor, but keep in mind it might make the dough a bit stickier. Both options yield soft rolls, so it’s really about your texture and taste preference.
What happens if my yeast doesn’t bubble during proofing?
If you don’t see bubbles after mixing the yeast with warm water and milk, it usually means the yeast is dead—often because the water was too hot or the yeast is expired. It’s best to start over to make sure your rolls rise beautifully.
Can I make these rolls gluten-free?
This recipe relies on all-purpose flour for the perfect texture and rise. Gluten-free flours behave very differently, so if you want to make gluten-free rolls, look for a specialized gluten-free yeast roll recipe designed for those flours.
Why is my dough so sticky? Should I add more flour?
The dough for the Easy Yeast Rolls Recipe is intentionally sticky to create soft, fluffy rolls. Resist the urge to add more flour, as that can make the rolls dense. Use oiled hands and greased tools to handle the dough instead.
Can I double this recipe?
Yes, doubling is straightforward. Just make sure your mixing bowl and equipment can handle more dough, and extend rising times slightly if needed. These rolls are perfect for feeding a crowd!
Final Thoughts
There is something truly special about pulling fresh, warm rolls from the oven, and this Easy Yeast Rolls Recipe captures that magic perfectly. It’s approachable, reliable, and yields a batch of rolls that feel homemade in the best way possible. Take a chance on this recipe and watch how these rolls become favorites in your family and friends’ hearts. Baking bread doesn’t have to be complicated, and with this recipe, it’s downright delightful!
Print
Easy Yeast Rolls Recipe
- Prep Time: 5 minutes
- Cook Time: 15 minutes
- Total Time: 50 minutes
- Yield: 12 rolls
- Category: Bread
- Method: Baking
- Cuisine: American
Description
These Easy Yeast Rolls are soft, fluffy, and perfect for any meal. Made with simple ingredients and baked in a muffin tin, they have a wonderful golden crust and tender interior. The dough is intentionally loose and sticky for the perfect texture, and they rise beautifully with a quick two-step rising process. Enjoy warm with butter and jam for a delightful homemade bread experience.
Ingredients
Yeast Mixture
- 1 tablespoon yeast
- 1/4 cup warm water (around 105°F)
- 1 cup warm milk (around 105°F)
Main Dough
- 3 tablespoons sugar
- 1 and 1/2 teaspoons kosher salt
- 3 tablespoons shortening
- 1 large egg
- 2 & 1/4 cups + 2 tablespoons all-purpose flour
For Greasing
- Nonstick cooking spray or butter (for muffin tin and measuring cup)
Instructions
- Dissolve Yeast: In a large bowl or stand mixer, dissolve 1 tablespoon yeast in 1/4 cup warm water and 1 cup warm milk, both around 105°F. Warm tap water usually works well.
- Activate Yeast: Add 3 tablespoons sugar and stir. Let sit for 5 minutes until bubbles form, indicating the yeast is active. If no bubbles appear, the yeast has been killed by too-hot water; start over.
- Mix Initial Ingredients: Add 1 cup flour, 1 and 1/2 teaspoons kosher salt, 3 tablespoons shortening, and 1 large egg. Beat with the paddle attachment until smooth.
- Add Remaining Flour: Add remaining 1 and 1/4 cups + 2 tablespoons flour. Beat until smooth, scraping sides, then continue beating for 2 more minutes. Do not add more flour; the dough will be very sticky.
- First Rise: Cover the bowl and let the dough rise for 30 minutes.
- Preheat Oven: Preheat the oven to 400°F (205°C).
- Prepare Muffin Tin: Coat a muffin tin thoroughly with nonstick spray or butter, including the top flat edges and inside each cavity.
- Portion Dough: Spray a 1/4 cup measuring cup with nonstick spray or grease with butter. Scoop dough with the cup and carefully drop into a muffin tin cavity, oiling hands if needed.
- Fill Muffin Tin: Continue filling muffin cavities equally. For smooth tops, turn each roll over and smooth with a spoon or fingers.
- Cover and Second Rise: Cover the pan with plastic wrap sprayed with nonstick spray to prevent sticking. Let rise in a warm spot (like on top of the fridge) for 20 minutes or longer for puffier rolls.
- Bake Rolls: Bake at 400°F for 13-15 minutes until tops turn golden. Check bottom color by lifting a roll edge; it should be golden brown before removing.
- Cool and Serve: Remove rolls from muffin tin immediately after baking and cool on a wire rack to avoid sogginess. Serve warm with butter and jam.
Notes
- The water and milk temperature is critical; too hot will kill the yeast.
- Do not add extra flour; the dough is meant to be sticky for a tender crumb.
- Greasing the measuring cup helps portion sticky dough easily.
- Letting the rolls rise longer in the second rise will yield fluffier rolls.
- Cooling on a wire rack prevents soggy bottoms.


